
Development Docker Image
Start building your website or application today. It's free.
The October CMS Development Docker Image includes everything you need to explore the platform and start building a website instantly, without configuring your development machine. You can have a running October CMS container on your computer in a few minutes after reading this page or watching the video tutorial.
Two ways to run October CMS locally
Use the Quick Demo to try out the platform instantly with a pre-built Docker image that includes PHP 8.4, MariaDB and Apache. For building real projects, set up a Development Environment with DDEV, which runs your site in Docker and lets you edit your project files directly on your computer. You can run multiple projects side by side.
macOS, Windows, and Linux
Both methods are compatible with ARM64 and AMD64 CPU architectures and work on Windows, Linux and macOS systems with Intel and Apple Silicon processors.
Both setup methods store your source code and database on your computer, so you won't lose your work if a container is deleted. Just recreate it and continue from where you left off!
Installing and Using October CMS Development Docker Image
Please select your platform:
-
I'm using Windows
-
I'm using macOS or Linux
Select your preferred installation method:
-
Quick Demo: the fastest way to try October CMS
Pull and run a pre-built Docker image. Great for evaluation, not recommended for real development.
-
Development Setup: for building real projects
Set up a persistent, fully-featured development environment with DDEV, editing your project files directly on your computer.
Quick Demo on Windows using Docker Desktop
This method is intended for trying out October CMS. For building real projects, use the Development Setup method.
- Install and launch Docker Desktop for Windows.
-
Launch Command Prompt and run
docker pull octobercms/october:latest - In Docker Desktop, go to Images, find the pulled image, and click Run.
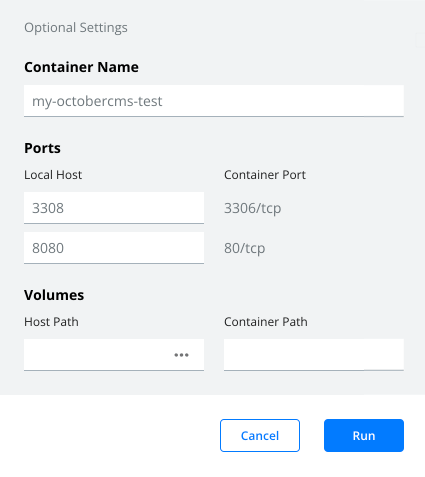
- In the container configuration popup, click Optional Settings.
- Enter the container name, e.g. my-octobercms-test. If you skip that step, a container name will be generated automatically.
- Click the Plus icon in the Ports section to reveal settings for the port 80.
- Enter a forwarding port number for the container's port 80. You will use this port to access the installation in a browser. You can use 8080 or a similar value. Remember that you can't have two running containers that use the same port number. We recommend using a unique port number for every container.
- Optionally, enter a forwarding port number for the database port 3306. You can use that port to connect to the MariaDB server running in the container.
- Click Run to start the container.
After the container starts, you should be able to access the installation in a browser, e.g. http://localhost:8080. It can take a few minutes for the container to configure itself after the first launch. If the page doesn't open, try refreshing it until it loads.
Using the Image
After creating the container, you can control it on the Containers / Apps tab in Docker Desktop. Please note that deleting the container will also delete any data and files that you created in the container. You can map Docker volumes to preserve your data, as shown in the example below.
Running with Data Persistence
You can run the container from the command line with volume mounts to protect your files and database:
docker run -d \
    --name my-october \
    -p 8080:80 \
    -p 3306:3306 \
    -v my_october_files:/var/www/html \
    -v my_october_db:/var/lib/october-mysql \
    octobercms/october:latest
With this configuration, you can delete and recreate the container without losing your data.
Editing files in the container
You can access files in the container using the Remote-Containers extension for Microsoft Visual Studio Code.
- Install the extension.
- Open the Command Palette (
ctrl+shift+p) and select Remote-Containers: Attach to Running Container. - Select your container.
- That will open a new Code window. Click the Open Folder button in the sidebar and select the
/var/www/htmldirectory.
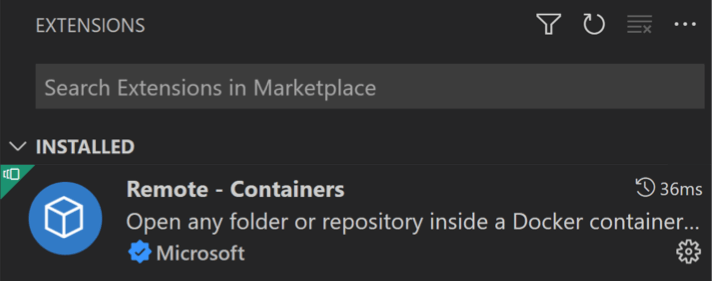

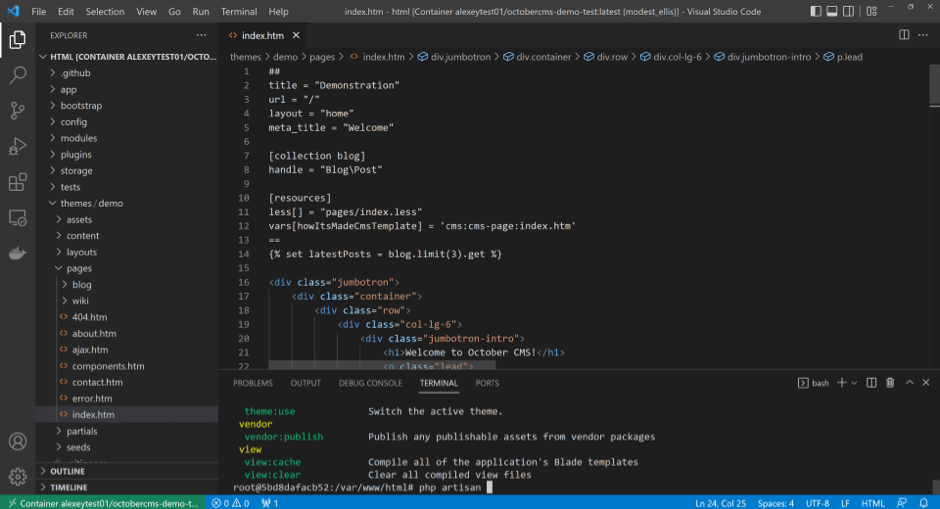
You can now edit theme files and experiment with creating plugins.
Running CLI commands in the container
The Remote-Containers: Attach to Running Container command described above connects the Visual Studio Code Terminal to the container shell. To open the Terminal, use the ctrl+` hotkey or select View / Terminal from the main menu. The Terminal opens in the October CMS installation directory, which is /var/www/html.
In the Terminal you can run any CLI commands, including Artisan and Composer commands. Run php artisan to see the list of available commands.
Accessing the database
The MariaDB database is called octobercms. You can access it using the mysql CLI tool from the Visual Studio Code Terminal or your host machine.
- In the Visual Studio Code Terminal run
mysql -uroot -proot octobercms. - Alternatively, if you forwarded the database port during the container creation and you have the MySQL client tools installed on your host computer, you can connect from your host machine in Windows Command Prompt:
mysql --host=127.0.0.1 -uroot -proot --port=3307 octobercms. Theportargument is the port number you entered in the container configuration. - Alternatively, if you configured the database port forwarding, you can use any database GUI tool, for example, MySQL Workbench.
Quick Demo on macOS or Linux using Docker Desktop
This method is intended for trying out October CMS. For building real projects, use the Development Setup method.
- Install and launch Docker Desktop for macOS or Linux.
-
Launch Terminal and run
docker pull octobercms/october:latest - In Docker Desktop, go to Images, find the pulled image, and click Run.
- In the container configuration popup, click Optional Settings.
- Enter the container name, e.g. my-octobercms-test. If you skip that step, a container name will be generated automatically.
- Click the Plus icon in the Ports section to reveal settings for the port 80.
- Enter a forwarding port number for the container's port 80. You will use this port to access the installation in a browser. You can use 8080 or a similar value. Remember that you can't have two running containers that use the same port number. We recommend using a unique port number for every container.
- Optionally, enter a forwarding port number for the database port 3306. You can use that port to connect to the MariaDB server running in the container.
- Click Run to start the container.
After the container starts, you should be able to access the installation in a browser, e.g. http://localhost:8080. It can take a few minutes for the container to configure itself after the first launch. If the page doesn't open, try refreshing it until it loads.
Using the Image
After creating the container, you can control it on the Containers / Apps tab in Docker Desktop. Please note that deleting the container will also delete any data and files that you created in the container. You can map Docker volumes to preserve your data, as shown in the example below.
Running with Data Persistence
You can run the container from the command line with volume mounts to protect your files and database:
docker run -d \
    --name my-october \
    -p 8080:80 \
    -p 3306:3306 \
    -v my_october_files:/var/www/html \
    -v my_october_db:/var/lib/october-mysql \
    octobercms/october:latest
With this configuration, you can delete and recreate the container without losing your data.
Editing files in the container
You can access files in the container using the Remote-Containers extension for Microsoft Visual Studio Code.
- Install the extension.
- Open the Command Palette (
cmd+shift+p) and select Remote-Containers: Attach to Running Container. - Select your container.
- That will open a new Code window. Click the Open Folder button in the sidebar and select the
/var/www/htmldirectory.
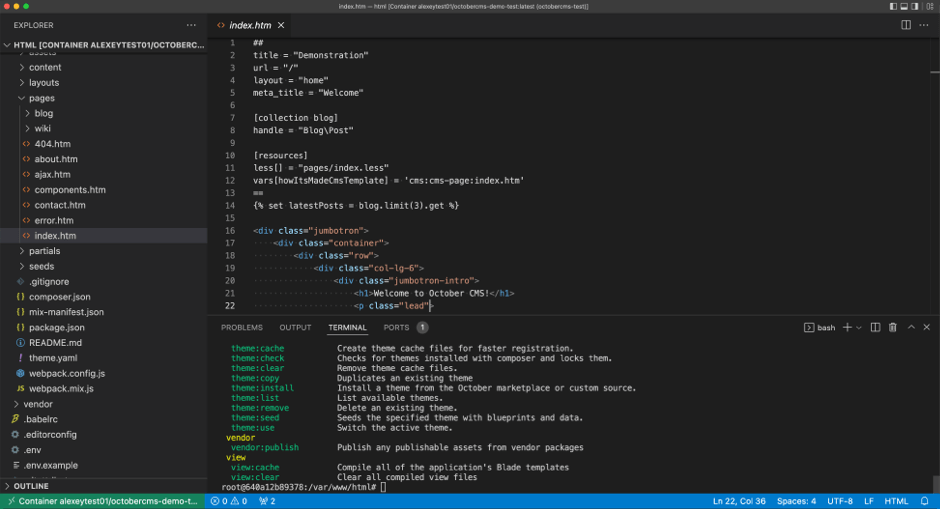
You can now edit theme files and experiment with creating plugins.
Running CLI commands in the container
The Remote-Containers: Attach to Running Container command described above connects the Visual Studio Code Terminal to the container shell. To open the Terminal, use the ctrl+` hotkey or select View / Terminal from the main menu. The Terminal opens in the October CMS installation directory, which is /var/www/html.
In the Terminal you can run any CLI commands, including Artisan and Composer commands. Run php artisan to see the list of available commands.
Accessing the database
The MariaDB database is called octobercms. You can access it using the mysql CLI tool from the Visual Studio Code Terminal or your host machine.
- In the Visual Studio Code Terminal run
mysql -uroot -proot octobercms. - Alternatively, if you forwarded the database port during the container creation and you have the MySQL client tools installed on your host computer, you can connect from your host machine in Terminal:
mysql --host=127.0.0.1 -uroot -proot --port=3307 octobercms. Theportargument is the port number you entered in the container configuration. - Alternatively, if you configured the database port forwarding, you can use any database GUI tool, for example, MySQL Workbench.
Setting Up a Development Environment on Windows with DDEV
A persistent, fully-featured environment for building real projects with October CMS. DDEV is an open source tool that runs your site in Docker containers with a simple command line interface.
Prerequisites
DDEV runs on top of a Docker-compatible container runtime. Install the runtime first, then DDEV.
1. Set up WSL 2
DDEV on Windows runs inside WSL 2 (Windows Subsystem for Linux) for the best performance. Open Windows PowerShell as Administrator and run:
wsl --install --no-distribution
wsl --update
wsl --install Ubuntu
Restart your computer when prompted, then launch Ubuntu from the Start menu to finish setting up your Linux user account.
2. Install DDEV and Docker
Download and run the DDEV Windows installer. When prompted, choose the WSL 2 with Docker CE option, which installs Docker automatically inside your WSL 2 distribution. This is the recommended setup and does not require Docker Desktop.
Alternatively, you can use Docker Desktop with WSL 2 integration enabled, but the Docker CE option above is faster and more reliable.
From this point on, run all commands inside the Ubuntu (WSL 2) terminal.
Creating a Project
Create a directory for your project, configure DDEV and install October CMS:
mkdir my-october-site
cd my-october-site

ddev config --project-type=laravel --webserver-type=apache-fpm
ddev start
ddev composer create-project october/october
ddev artisan october:install --no-interaction
DDEV automatically configures the database connection and application URL for you. When the installation finishes, open the site in your browser:
ddev launch
Your site is available at https://my-october-site.ddev.site. To open the backend, add /backend to the URL.
Registering the Software
A fresh installation runs with some limitations. To install plugins and themes from the Marketplace and receive the latest updates, register the software using your license key in the backend, under Settings, System Updates. For step by step instructions, see the Licensing the Development Docker Container page.
Using the Development Environment
Common commands
Run these commands from inside your project directory:
ddev start: Start the project containers.ddev stop: Stop the project containers.ddev restart: Restart the project containers.ddev launch: Open the site in your browser.ddev ssh: Open a shell inside the web container.ddev logs: View container logs.ddev describe: Show project details and URLs.ddev list: List all projects and their status. Add--active-onlyto show only running projects.
Running ddev on its own opens an interactive dashboard in your terminal, where you can see your projects and manage them without remembering individual commands.
Editing files
Your project files live in the my-october-site directory on your computer, so you can edit them directly with any editor, such as Visual Studio Code. Changes are reflected in the running site immediately. With WSL 2, open the project from the Ubuntu terminal by running code . in the project directory.
Running CLI commands
DDEV provides shortcuts that run Artisan and Composer inside the container:
ddev artisan october:update: Run an Artisan command.ddev composer require acme/plugin: Run a Composer command.
These shortcuts are equivalent to running the tools inside the container directly. To run the raw commands yourself, open a shell in the web container with ddev ssh, then run php artisan or composer as usual:
ddev ssh
php artisan october:update
composer require acme/plugin
exit
You can also run any single command in the container without opening a shell by prefixing it with ddev exec, for example ddev exec php artisan cache:clear.
Accessing the database
DDEV runs a MariaDB database for your project. To open a database session, run:
ddev mysql
The default credentials inside the container are user db, password db, database db, on host db. Run ddev describe to see the full connection details, including the port for connecting from a database GUI tool on your computer. To open the built-in web database manager, run ddev launch -p.
Stopping everything and freeing ports
DDEV manages its own containers, so you don't need Docker Desktop to stop things. DDEV serves your sites through a shared router that uses ports 80 and 443 on your computer. To stop a single project, run ddev stop from its directory. To stop every project at once, run:
ddev stop --all
Stopping projects leaves the shared router running, so ports 80 and 443 stay reserved. To shut down DDEV completely and free those ports for another application, run:
ddev poweroff
DDEV starts back up automatically the next time you run ddev start. If a program outside DDEV is already holding a port that DDEV needs, run ddev utility port-diagnose to find out which process is using it.
Rebuilding a project
Your application files are stored on your computer, independently of the containers. If something goes wrong, you can rebuild the environment without losing your source code. Start with a restart:
ddev restart
If a restart is not enough, stop the project and start it again:
ddev stop
ddev start
Deleting a project
To remove the project from DDEV entirely, run ddev delete from the project directory:
ddev delete
This removes the project's containers and database but keeps your source code on your computer. DDEV creates a database snapshot automatically before deleting. If you don't need a backup, skip it with --omit-snapshot:
ddev delete --omit-snapshot
You can re-add the project later by running ddev config and ddev start from the same directory.
To delete the project along with your files, remove the project directory from your computer afterwards.
Setting Up a Development Environment on macOS or Linux with DDEV
A persistent, fully-featured environment for building real projects with October CMS. DDEV is an open source tool that runs your site in Docker containers with a simple command line interface.
Prerequisites
DDEV runs on top of a Docker-compatible container runtime. Install the runtime first, then DDEV.
1. Install a Docker runtime
On macOS, we recommend OrbStack, which is free, fast and the easiest option to install:
brew install orbstack
On Linux, install Docker CE using your distribution's package manager.
Docker Desktop also works on macOS if you already have it installed.
2. Install DDEV
On macOS, install DDEV with Homebrew:
brew install ddev/ddev/ddev
mkcert -install
On Linux, use the universal install script:
curl -fsSL https://ddev.com/install.sh | bash
mkcert -install
See the DDEV installation guide for other platforms and package managers.
Creating a Project
Create a directory for your project, configure DDEV and install October CMS:
mkdir my-october-site
cd my-october-site

ddev config --project-type=laravel --webserver-type=apache-fpm
ddev start
ddev composer create-project october/october
ddev artisan october:install --no-interaction
DDEV automatically configures the database connection and application URL for you. When the installation finishes, open the site in your browser:
ddev launch
Your site is available at https://my-october-site.ddev.site. To open the backend, add /backend to the URL.
Registering the Software
A fresh installation runs with some limitations. To install plugins and themes from the Marketplace and receive the latest updates, register the software using your license key in the backend, under Settings, System Updates. For step by step instructions, see the Licensing the Development Docker Container page.
Using the Development Environment
Common commands
Run these commands from inside your project directory:
ddev start: Start the project containers.ddev stop: Stop the project containers.ddev restart: Restart the project containers.ddev launch: Open the site in your browser.ddev ssh: Open a shell inside the web container.ddev logs: View container logs.ddev describe: Show project details and URLs.ddev list: List all projects and their status. Add--active-onlyto show only running projects.
Running ddev on its own opens an interactive dashboard in your terminal, where you can see your projects and manage them without remembering individual commands.
Editing files
Your project files live in the my-october-site directory on your computer, so you can edit them directly with any editor, such as Visual Studio Code. Changes are reflected in the running site immediately.
Running CLI commands
DDEV provides shortcuts that run Artisan and Composer inside the container:
ddev artisan october:update: Run an Artisan command.ddev composer require acme/plugin: Run a Composer command.
These shortcuts are equivalent to running the tools inside the container directly. To run the raw commands yourself, open a shell in the web container with ddev ssh, then run php artisan or composer as usual:
ddev ssh
php artisan october:update
composer require acme/plugin
exit
You can also run any single command in the container without opening a shell by prefixing it with ddev exec, for example ddev exec php artisan cache:clear.
Accessing the database
DDEV runs a MariaDB database for your project. To open a database session, run:
ddev mysql
The default credentials inside the container are user db, password db, database db, on host db. Run ddev describe to see the full connection details, including the port for connecting from a database GUI tool on your computer. To open the built-in web database manager, run ddev launch -p.
Stopping everything and freeing ports
DDEV manages its own containers, so you don't need Docker Desktop to stop things. DDEV serves your sites through a shared router that uses ports 80 and 443 on your computer. To stop a single project, run ddev stop from its directory. To stop every project at once, run:
ddev stop --all
Stopping projects leaves the shared router running, so ports 80 and 443 stay reserved. To shut down DDEV completely and free those ports for another application, run:
ddev poweroff
DDEV starts back up automatically the next time you run ddev start. If a program outside DDEV is already holding a port that DDEV needs, run ddev utility port-diagnose to find out which process is using it.
Rebuilding a project
Your application files are stored on your computer, independently of the containers. If something goes wrong, you can rebuild the environment without losing your source code. Start with a restart:
ddev restart
If a restart is not enough, stop the project and start it again:
ddev stop
ddev start
Deleting a project
To remove the project from DDEV entirely, run ddev delete from the project directory:
ddev delete
This removes the project's containers and database but keeps your source code on your computer. DDEV creates a database snapshot automatically before deleting. If you don't need a backup, skip it with --omit-snapshot:
ddev delete --omit-snapshot
You can re-add the project later by running ddev config and ddev start from the same directory.
To delete the project along with your files, remove the project directory from your computer afterwards.