Running October on AWS - Part 2
Posted in Architecture, Tutorials on May 27, 2019
This post continues as the second part of the Running October on AWS series. In Part 1 we created a CloudFormation template defining the application network, Staging web server, RDS server and EFS file system.
In this article, we are going to install the web server software and October CMS on the Staging server. We will also create an Amazon Machine Image (AMI), containing the configured web server and October installation. This image will become the source image for web servers in the auto scaling group. Before continuing, please make sure to read Part 1, because this post heavily relies on the concepts described in the first article.
Anatomy of the cloud October server
There are only a few differences between an October application running in a single server environment versus a multi-server cloud environment. This means that you don’t need to update the application code to migrate to the AWS, although you might want to start making updates later due to the optimization and cost reduction considerations.
The image below displays the application file structure.
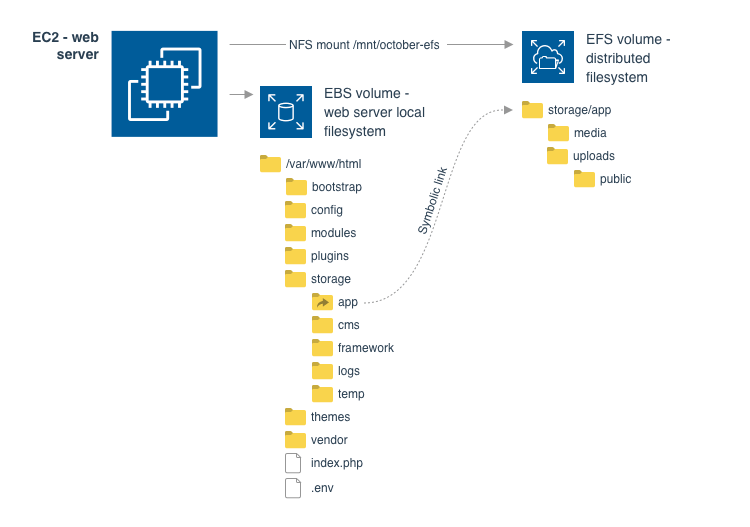
On the Staging and other web servers, we use two types of storage - the Elastic Block Store (EBS) and Amazon Elastic File System (EFS).
The EBS volume is attached to server instances automatically when an instance starts. This volume is not persistent - AWS creates it from the AMI image when the EC2 instance first launches. It is deleted when the instance is terminated (removed), and thus cannot contain any long-term data. This volume is not shared with any other web server. We use EBS volume to carry the operating system files, application code, configuration templates and cache.
The Amazon Elastic File System (EFS) volume is persistent and can be attached to multiple web servers. We use this store to keep long-term data, such as media and user files. In October CMS this data is usually stored in the storage/app directory. In our cloud solution, the storage/app directory will instead be a symbolic link to a directory on the EFS volume. In this way, we make the directory contents persistent and shared between all web servers. EFS is designed as a distributed file system, allowing parallel access from multiple servers, which makes it a perfect candidate for a multi-server environment. The amount of data you can store in the EFS is virtually unlimited. You can read about the performance of EFS on this page.
Caching
You might have noticed that we keep the application cache files in the EBS, making them local to a web server. We do this for the sake of keeping our tutorial simple to understand. A distributed cache could be a better solution for high load systems. The only challenge with using a distributed cache is that the cache keys must depend on the current application version. You can use the AMI identifier as the application version identifier, later we will explain how we will use different AMIs to upgrade the application. On an EC2 instance, the AMI ID can be retrieved from the instance metadata at http://169.254.169.254/latest/meta-data/ami-id. This URL is static and valid for requests from any EC2 instance.
User sessions
As web server instances can be launched and stopped during the auto scaling or stack updating process, sessions must be global. A database is a good option for storing global sessions. Laravel and October support database sessions out of the box. We will show how to enable database session later in this post.
Staging server - installing the web server software
Before we can install October CMS, we must first install and configure the Apache web server and PHP. These packages are not included to the default Amazon Linux distribution.
In the last section of the Part 1, we explained how to launch a stack basing on the CloudFormation template. Repeat the steps from the Creating the CloudFormation stack from the template section to create the stack and ssh into the running Staging server. Make sure to remember the database name, database username and password.
Before we proceed we should note that you can stop going through the tutorial at any time and resume the next day or whenever you want. As you don’t want to be charged for the running EC2 and RDS instances, make sure to stop them before you leave, and start after you return. Be careful to make sure you don’t terminate the instances, otherwise, you will lose your progress and will need to recreate the stack from scratch. Please note that there can be minor costs related to the attached EBS storage and provisioned RDS storage, which was explained in Part 1. When you return just start EC2 and RDS instances again.
Let's the fun begin!
After logging into the Staging instance by SSH, the first thing you will want to do is to update the system packages:
sudo yum update -yThe next section briefly describes the LAMP stack installation. It does not describe any fine tuning topics, like gzip output compression, PHP OPcache and resource caching HTTP headers. We will discuss site speed optimization in another tutorial. You can update web server configuration in the multi-server solution discussed in this series without suffering any downtimes.
Install MariaDB PHP package and PHP 7.2:
sudo amazon-linux-extras install -y lamp-mariadb10.2-php7.2 php7.2Install the MariaDB client and Apache server:
sudo yum install -y httpd mariadb-clientStart Apache:
sudo systemctl start httpdConfigure Apache to start on boot:
sudo systemctl enable httpdTo make sure that Apache works, open your Staging server’s IP address in a browser:
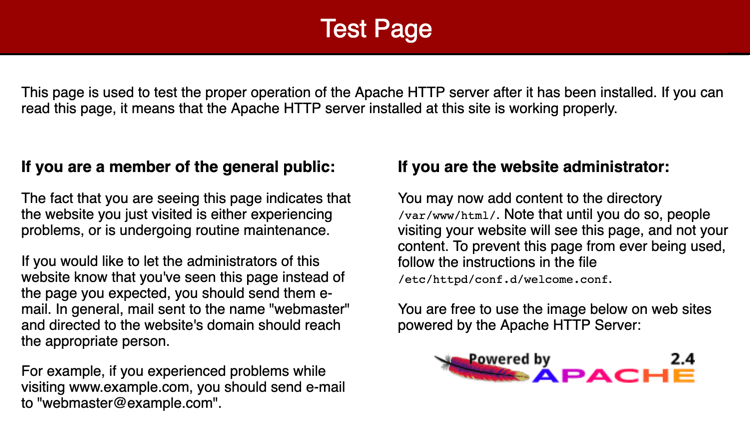
Now let’s add the ec2-user account, which you use to connect to your EC2 instances, to the apache group. Apache user belongs to that group too and by including both users to the same group we can allow them to work with same files in the /var/www directory by setting up group permissions for files and directories.
sudo usermod -a -G apache ec2-userLog out the SSH session and login again to pick up the new group and continue:
exit
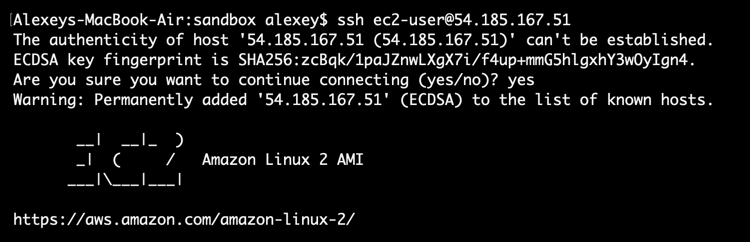
ssh ec2-user@your-server-ipMake sure that ec2-user now belongs to the apache group:
groupsYou should see apache in the command output.
Update group ownership of the /var/www directory and add group write permissions on future subdirectories:
sudo chown -R ec2-user:apache /var/www
sudo chmod 2775 /var/www && find /var/www -type d -exec sudo chmod 2775 {} \;
Set file permissions in the /var/www directory. This command is not really needed at this time, because we are going to delete the default directory contents and install October CMS, but you can use it as a reference if you need to fix file permissions in the future:
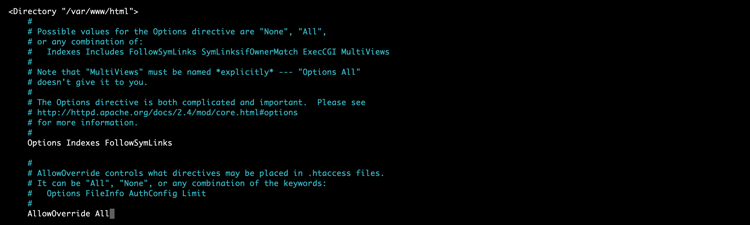
find /var/www -type f -exec sudo chmod 0664 {} \;October CMS uses Apache rewrite engine, so we must allow mod_rewrite to be used in the October directory. This can be done by editing Apache configuration file at /etc/httpd/conf/httpd.conf. We will use nano editor. Start the editor:
sudo nano /etc/httpd/conf/httpd.confFind the Directory definition: <Directory "/var/www/html"> and replace AllowOverride None with AllowOverride All. Save the changes by pressing Ctrl+O and Enter. Exit the editor with Ctrl+X.
Restart Apache to apply the changes:
sudo service httpd restartInstall PHP ZIP extension:
sudo yum install php-pear php-devel gcc libzip-devel zlib-devel -y
sudo pecl install zip-1.13.5
echo 'extension=zip.so' | sudo tee -a /etc/php.ini
Install PHP GD library:
sudo yum install php-gd -yInstall PHP Mbstring library:
sudo yum install php-mbstring -yRestart PHP-FPM to apply the changes:
sudo service php-fpm restartInstalling October CMS
Now we can install October. We will use the CLI installation option. Go to the web root directory, download and run the installer:
cd /var/www/html
curl -s https://octobercms.com/api/installer | php
Start the configuration master:
php artisan october:install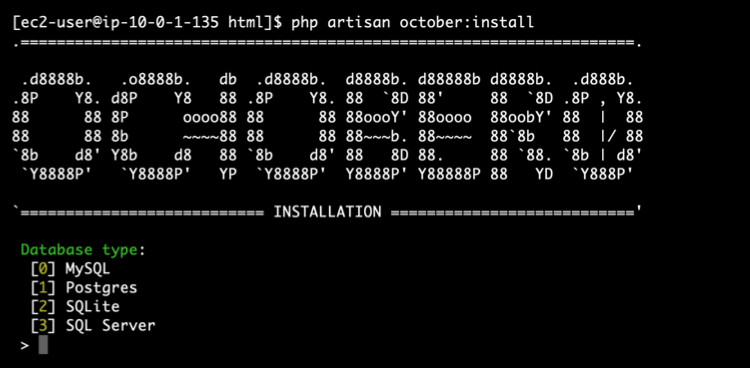
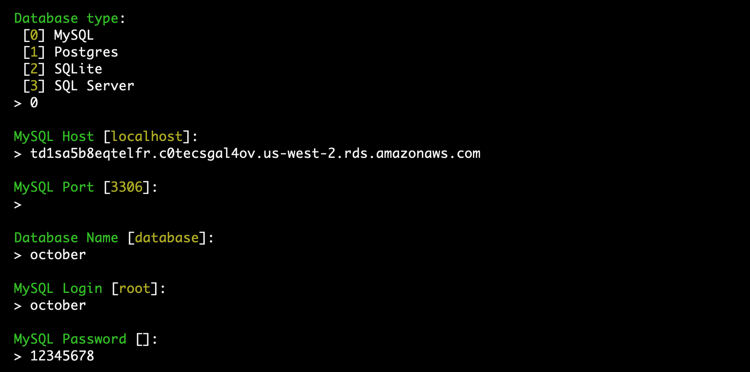
Select MySQL option [0]. For the MySQL host open the RDS page in the AWS console and copy the host URL there. This was explained in the Checking the EFS and database connectivity section of Part 1.
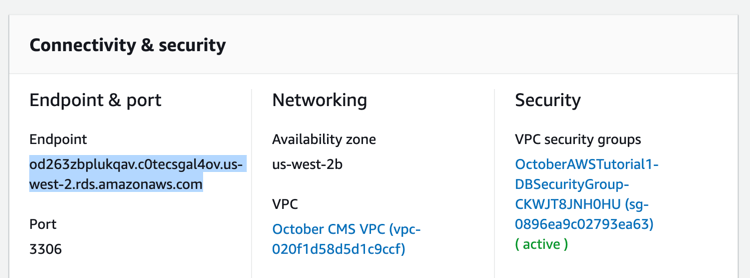
Use the default MySQL port 3306. For the database name, username and password use the values that you entered during the stack creation.
Provide details for the administrator user account. You can use the default values, as we are going to rebuild the database later. For the Application URL, you can use your server IP, for example, http://52.11.173.172. We can always change this later.
Answer “yes” to the prompt to configure the advanced options.
If you are going to transfer your existing October database, provide the application key from your current installation. If you fail to do so, October won’t be able to decrypt sensitive values from the database.
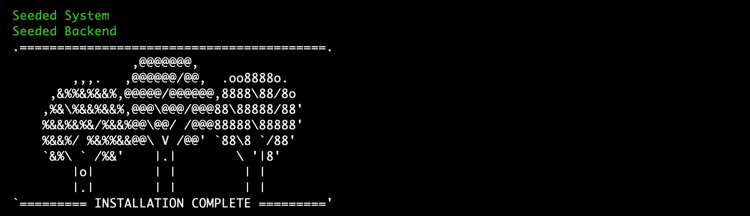
Use file permission mask 664 and folder permission mask 775. Whether to install the Builder and Drivers plugins is up to you.
Congratulations, you just installed October CMS to AWS EC2 instance!
For now, we are going to disable the back-end HTTPS redirection. We will explain how to enable HTTPS on the production servers later in the series. Open config/cms.php in the nano editor:
nano /var/www/html/config/cms.phpFind the backendForceSecure parameter and change its value to false. Press Ctrl+O and Enter to save the file. Use Ctrl+X to exit the editor.
Now you should be able to log into your October installation back-end by visiting http://your-staging-ip/backend, providing that you have specified backend as the back-end URL during the installation.
Cloudifying the October installation
The next steps will make your October installation compatible with the automatic deployment and multi-server environment. First, we will enable database sessions. In your SSH terminal open the session configuration file in the nano editor:
nano /var/www/html/config/session.phpReplace the driver parameter value with database:
'driver' => 'database'Press Ctrl+O and Enter to save the file. Press Ctrl+X to exit the editor.
The next step enables the DotEnv configuration. We use this option mostly because we are going to create October configuration files during the automated deployments, and generating a single plain text file is simpler than generating multiple PHP files.
cd /var/www/html
php artisan october:env
We will need the generated .env file contents later. You can use nano, or cat commands to access the file contents. Using cat:
cat /var/www/html/.envCopy the file contents to the clipboard and paste to a text editor on your computer.
Install EFS utilities:
sudo yum install -y amazon-efs-utilsCreate a directory for the mount point:
sudo mkdir -p /mnt/october-efs
sudo chown -R ec2-user:apache /mnt/october-efs
The next command mounts the EFS volume to the Staging instance. We explained how to obtain the File System ID in the Part 1:
sudo mount -t efs fs-xxxxxxx:/ /mnt/october-efsPrepare file storage directories on the EFS volume:
mkdir -p /mnt/october-efs/storage/appMove the current contents of the app storage directory to the EFS volume:
mv -v /var/www/html/storage/app/* /mnt/october-efs/storage/appThe next two commands replace the directory storage/app with a symbolic link pointing to the directory on the EFS volume:
rm -rf /var/www/html/storage/app
ln -s /mnt/october-efs/storage/app /var/www/html/storage/app
Fix permissions to add the Apache group again to all the directories we just created:
sudo chown -R ec2-user:apache /mnt/october-efsTo check if October is still able to upload files and that they are really stored in the EFS volume open the Media page in your October installation’s back-end and upload a file:
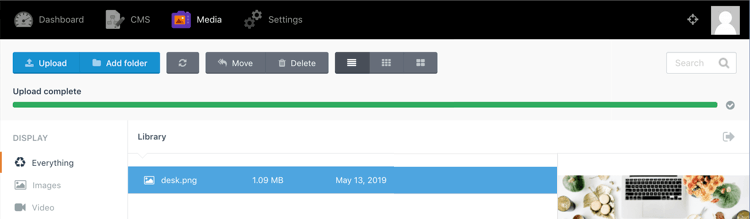
Now return to the SSH session and check if the file is on the EFS:
ls /mnt/october-efs/storage/app/media
Further configuration of the October installation
Now you might be tempted to continue configuring your Staging server, import your existing database and install all October plugins and themes required for your website. We suggest that you to wait until you have a complete stack at the end of the series. To save your money we are going to delete the stack at the end of this post, so you will lose your database and EFS contents. Alternatively, you can stop the RDS and EC2 instances until the next post is published, but remember that you will be still billed for the provisioned database storage and EC2 EBS volume.
Creating the source web server disk image
Now that we have a fully configured and working October CMS installation on the Staging EC2 instance, we can use that instance to create our own AMI disk image to use when AWS launches new web servers in our infrastructure. This image will include October CMS files, web server software and all the required configuration baked in so that we won’t need to configure every new web server from scratch.
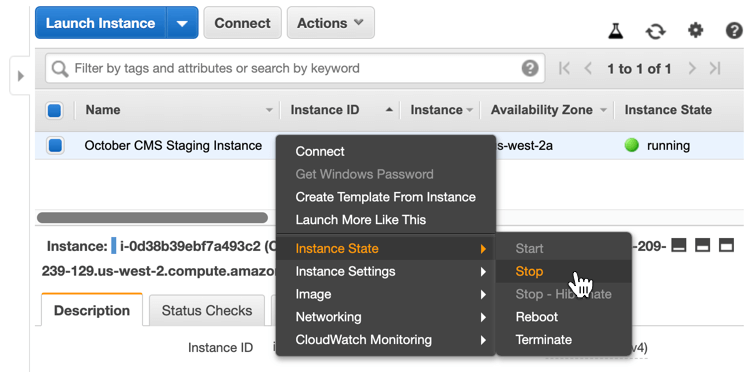
Go to the AWS console and navigate to the Services / EC2 / Instances page. Find the Staging EC2 instance, right click and select Instance State / Stop in the context menu:
Wait until the instance stops, right-click it again and select Image / Create Image. In the Create Image popup, you can leave the default values as is. Make sure that the Delete on Termination checkbox is on. In the Image Name field enter some meaningful value, for example, october-tutorial-web-server-image-v1.

Note the v1 suffix. Technically, versioning images is not required, but we recommend to do so because you will have a lot of image files during your stack life. You should be able to determine which image is the last one, and what images you can safely delete. You should also be able to rollback your infrastructure for a version or two in case if there’s a problem with the latest image.
Before we continue, go to the EC2 / AMIs page, find your new image in the list and make sure that its current status is Available.
Automating the Staging service deployment
Your Staging October installation is now safely stored in the AMI image. Now we are going to delete the Staging EC2 instance and recreate it using the CloudFormation. Why this is needed? Remember that the Staging instance is a part of your CloudFormation stack and although it is a source web server for all other servers, and is not included into the auto scaling group, you sometimes will need to replace it. AWS might want to replace it because of the Instance Retirement. CloudFormation should be able to restore the Staging instance in that case.
Also, every time we stop and start the Staging instance, we need some of the commands to run automatically, and we can do it using the CloudFormation EC2 Metadata feature.
Let’s update the CloudFormation template. In the StagingInstance definition, we will add the Metadata section, which contains the AWS::CloudFormation::Init block. This section allows initializing the instance configuration, including files, system packages, user roles and some others. We want CloudFormation to generate the October .env file with some values loaded from the stack configuration.
"Metadata" : {
  "AWS::CloudFormation::Init" : {
    "config" : {
      "files" : {
        "/var/www/html/.env" : {
          "content": { "Fn::Join" : ["", [
            "APP_DEBUG=false\n",
            "APP_URL=http://54.188.246.198/\n",
            "APP_KEY=YOUR-APP-KEY\n",
            "DB_CONNECTION=mysql\n",
            "DB_HOST=",{ "Fn::GetAtt": [ "DBInstance", "Endpoint.Address" ] },"\n",
            "DB_PORT=",{ "Fn::GetAtt": [ "DBInstance", "Endpoint.Port" ] },"\n",
            "DB_DATABASE=",{ "Ref" : "DBName" },"\n",
            "DB_USERNAME=",{ "Ref" : "DBUser" },"\n",
            "DB_PASSWORD=",{ "Ref" : "DBPassword" },"\n",
            "REDIS_HOST=127.0.0.1\n",
            "REDIS_PASSWORD=null\n",
            "REDIS_PORT=6379\n",
            "CACHE_DRIVER=file\n",
            "SESSION_DRIVER=database\n",
            "QUEUE_DRIVER=sync\n",
            "MAIL_DRIVER=smtp\n",
            "MAIL_HOST=smtp.mailgun.org\n",
            "MAIL_PORT=587\n",
            "MAIL_ENCRYPTION=tls\n",
            "MAIL_USERNAME=null\n",
            "MAIL_PASSWORD=null\n",
            "ROUTES_CACHE=false\n",
            "ASSET_CACHE=false\n",
            "LINK_POLICY=detect\n",
            "ENABLE_CSRF=true"
          ]]}
        }
      }
    }
  }
},
As you can see, the database configuration is not static in the template. The database host and port are loaded from the DBInstance resource using the Fn::GetAtt function. The database name, username and password are loaded from the stack parameters that you provided on the stack creation phase.
Another update adds the UserData property which basically runs the commands we ran earlier to configure the Staging instance. By default, AWS runs EC2 UserData only once, when the instance first launches. As we described earlier, the Staging server is going to be stopped almost all the time. We want to be able to start it when we want to update the application and create a new version of the server AMI image. To force the UserData to run on every start we use a trick described in this AWS support article.
"UserData" : { "Fn::Base64" : { "Fn::Join" : ["", [
  "Content-Type: multipart/mixed; boundary=\"//\"\n",
  "MIME-Version: 1.0\n",
  "\n",
  "--//\n",
  "Content-Type: text/cloud-config; charset=\"us-ascii\"\n",
  "MIME-Version: 1.0\n",
  "Content-Transfer-Encoding: 7bit\n",
  "Content-Disposition: attachment; filename=\"cloud-config.txt\"\n",
  "\n",
  "#cloud-config\n",
  "cloud_final_modules:\n",
  "- [scripts-user, always]\n",
  "\n",
  "--//\n",
  "Content-Type: text/x-shellscript; charset=\"us-ascii\"\n",
  "MIME-Version: 1.0\n",
  "Content-Transfer-Encoding: 7bit\n",
  "Content-Disposition: attachment; filename=\"userdata.txt\"\n",
  "\n",
  "#!/bin/bash\n",
  "yum update -y aws-cfn-bootstrap\n",
  "mkdir -p /mnt/october-efs\n",
  "mount -t efs ", { "Ref" : "FileSystem" }, ":/ /mnt/october-efs\n",
  "chown ec2-user:apache /mnt/october-efs\n",
  "/opt/aws/bin/cfn-init -v ",
  "         --stack ", { "Ref" : "AWS::StackName" },
  "         --resource StagingInstance ",
  "         --region ", { "Ref" : "AWS::Region" }, "\n",
  "--//\n"
]]}},
Note that to mount the EFS volume we use the { "Ref" : "FileSystem" } function in the template. This returns the ID of our FileSystem resource, making the template more dynamic.
Full CloudFormation template for the Part 2
Make sure to replace the APP_KEY value with the value from your own .env file.
Updating the stack
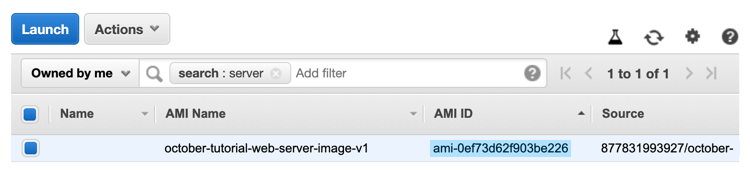
Now we are ready to apply the first stack update and recreate the Staging instance with a fully configured AMI image. First, obtain the image ID. Go to the Services / EC2 / AMIs page and copy the AMI ID value:
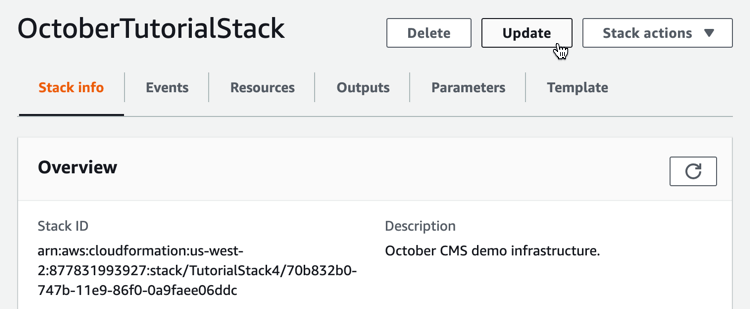
Now go to the Services / CloudFormation page and find your stack in the list. Click the Update button on the top of the stack details:
On the Update Stack page select the Replace current template option, Upload a template file and choose your template JSON file. Click Next. On the Parameters page paste the new Image ID value from the clipboard to the StagingImageId field and click Next. Feel free to skip the Configure stack options page, because we don’t have any stack options yet.
On the Review page wait until the Change set preview section loads and make sure that the StagingInstance is going to be replaced. The Staging instance is replaced because we have changed the StagingImageId parameter value, which is referred as a dependency for the StagingInstance resource in the stack template ("ImageId": {"Ref": "StagingImageId"}).
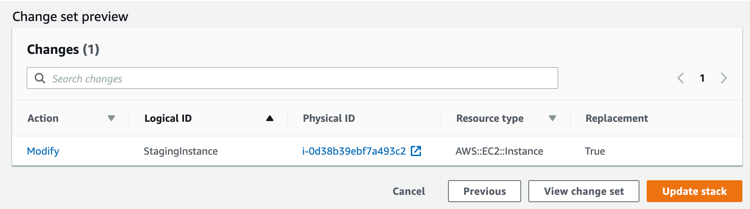
Click Update stack. The instance replacement process will take a few minutes. You can stay on the stack details page and keep refreshing it until the stack status changes to UPDATE_COMPLETE. Alternatively, you can open the EC2 / Instances page and watch how the Staging instance is being replaced:

After the update has finished you can click the new Staging instance in the EC2 instance list, copy its IP address and open in the browser to make sure that your October installation is still alive and functional.
Wrapping up the Part 2
This finishes the second part of the tutorial, but there will be a few more articles describing the remaining part of our demo cloud solution. Now you can delete the stack to reduce your AWS bill. The work that you have done during this tutorial won’t be lost - you have a new version of the CloudFormation template, and the web server configuration is saved in the AMI image. At the beginning of the next post, we will recreate the stack using that image and will proceed with extending the infrastructure. To delete the stack follow the steps described at the end of the Part 1. Remember that there can be minor costs associated with keeping the AMI image. You can open your Billing Dashboard from the main AWS menu at any time.
Congratulations, you have successfully completed an important part of our demo infrastructure! In the next article, we will continue extending the solution by adding auto-scaling and load balancing features. Please feel free to share your thoughts and questions in the comments. Stay tuned for the next post!