Running October on AWS - Part 1
Posted in Architecture, Tutorials on Apr 25, 2019
We are often asked by the community whether websites and applications built with October CMS can be scalable and if it’s possible to build high-availability infrastructure running October. In this post series we will explain how to build cloud infrastructure using Amazon Web Services (AWS).
We like AWS for many reasons. It provides a lot of managed services and constantly adds new services and improves existing ones. The variety of service tiers allows anyone to build a cloud solution fitting any budget. The documentation and technical support are excellent. Although optional technical support for developers is paid, the quality of the responses are top notch. A lot of answers can be found for free on the community forums or Stack Overflow.
Nonetheless, the AWS system has a steep learning curve. AWS includes almost a hundred services, in some cases providing overlapping functionality. On one hand it gives us a lot of options to choose from when designing a new solution. On the other hand, the abundance of services can be overwhelming, especially for beginners. We also noticed that the web is still lacking well written articles that describe the process from the beginning to the end.
Disclaimer: this tutorial does not provide an “official guide” to cloud infrastructure using October CMS, instead it’s just a single example of how it can be built. There are hundreds of ways to design infrastructure depending on the needs and budget. We do not provide technical support related to building a cloud solution but we will try to answer your questions in the comments.
Common challenges when migrating to the cloud
There are many questions that arise when developers consider moving their servers to the cloud. In this post series we will address many of them:
- Is a cloud solution going to be expensive? How to estimate the costs?
- How user sessions work in the load balanced auto-scaling environment, where user requests can be handled by different servers and servers can be terminated and replaced depending in the infrastructure load?
- How does the file system work? Will I need to rewrite the code to adapt the new directory layout, or the same code can be used? How the application running on multiple servers can access same user files without latencies and IO overhead?
- How and where to run the database server?
- How to backup user files and the database?
- How to monitor the infrastructure health?
- How to run scheduled tasks in the auto-scaling infrastructure where servers can be added and removed automatically? Running any scheduled tasks on a replaceable server does not seem to be a reliable solution. In addition, running same tasks simultaneously on different servers can be costly and undesirable. How can this be resolved?
- How to collect and analyze logs from all the servers?
- How to provide the security and safety for the data?
- How to update the application in the reliable manner without downtimes?
- How to scale the infrastructure automatically?
- How to configure DNS?
- How to set up HTTPS?
Infrastructure outline and cost estimation
In our demo infrastructure we will have one or more web servers running on AWS Elastic Compute Cloud (EC2) instances. The number of web servers is determined based on the infrastructure load. The traffic is distributed between the web servers using the AWS Application Elastic Load Balancer (ELB). The MySQL database will run on a AWS Relational Database Service (RDS) instance. Shared application file resources (user files, uploads, etc) will be stored in the Elastic File System (EFS) service. We will also have one special EC2 instance for running scheduled jobs (Service instance) and another EC2 serving as a Staging web server.
All the services will be described in detail in the post series. For now we want to show the top-level outline of the network and try to estimate the monthly cost of running the services.

AWS infrastructure can include many types of resources, such as Virtual Private Cloud (VPC), Subnets, Security Groups and Route Tables and others, but not all AWS resources are paid. In particular, with our demo infrastructure, we are going to pay for the following services (click the links to see AWS pricing):
- EC2 - web server(s)
- EC2 - Service instance
- Elastic Load Balancer (ELB)
- Elastic File System (EFS)
- Relational Database Service (RDS)
Note that the Staging EC2 instance is not included. Normally it’s going to be stopped all the time except when you want to test your new website version before deploying it to the production servers. Stopped EC2 instances are still charged for their attached Elastic Block Store volume, but EBS is cheap - it is $0.10 per GB per month for Oregon. For this demo infrastructure 8 GB is a sufficient EBS volume size, so it would be $0.8 per month per instance.
AWS infrastructure cost is flexible and you can adjust it by growing or reducing your servers capacity as you need. The beauty of well designed cloud infrastructure is that you can do it on the fly without any downtime. Another way to further reduce costs is to optimize your application and use AWS services which better fit your needs but are less expensive. For example, instead of serving large files from your EC2 instances through the load balancer, a cheaper and faster option would be to deliver them from AWS Simple Storage Service (S3). Another option is to use AWS CloudFront CDN for serving website static files instead of proxying them through EC2 instances and the load balancer. This tutorial does not explain all those options, but the infrastructure described here is a great starting point if you are planning to move to AWS.
All prices shown in this tutorial are actual for March 2019.
Cost of EC2 instances
EC2 instances are priced based on the capacity per hour. You can compare your current server capacity with different EC2 types in this table - make sure to select your AWS region wisely. Keep in mind that the database will run on another server, so if your web service is database intensive, it makes sense to choose smaller EC2 instances for web servers and larger RDS instance for the database.
For the infrastructure we’re building we will use Linux-based instances (we will give more information on this later) from the T2 family. You can choose another instance type and family, but all examples in this tutorial are given for Amazon Linux 2.
After finding EC2 instance size best matching your current server in the table you can estimate the monthly cost with multiplying the hourly cost by 730 (avg. hours per month). If you choose t2.small instance type in US West (Oregon), it will cost you $0.023*730=$16.79 per month. Now, note that the Service instance is not going to handle the Internet traffic, so you can choose a smaller instance for it. If you choose t2.micro type for your Service instance, it will cost around $8.5 per month.
Example subtotal for two EC2 instances - one t2.small web server instance and one t2.micro Service instance: $25.29/mo. This cost can increase depending on the amount of traffic - if one web server instance cannot handle the traffic, the infrastructure will add one or more web server instances. This scaling process will be described later in the series.
Cost of the Application ELB service
Calculating the cost of the Application Load Balancer service is more tricky. You can check the details on this AWS documentation page. There’s a hourly price for the Application ELB, which is $0.0225 for Oregon, and there’s a variable price part which depends on the Load Balancer Capacity Units (LCU). The LCU measures four dimensions: number of new connections per second, number of active connections per minute, the number of processed bytes and the number of rule evaluations. You are charged on the dimension with the highest usage. The cost of LCUs really depends on a type of your website or web service. The ELB Pricing page provides an example of calculating the Load Balancer cost.
Example subtotal:
- Web server and Service EC2 Instances: $25.29/mo
- ELB (no LCU cost included): $16.43/mo
- Subtotal: $41.72/mo
As it was mentioned above, optimizing the ELB cost is possible by reducing the number of requests and number of bytes by the means of serving some of your files through other AWS services (S3 or CloudFormation).
Cost of EFS
Calculating the cost of Elastic File System is straightforward with the pricing page showing an hourly rate. For Oregon region the price is $0.30 GB/mo. You can check the size of your October storage/app directory to estimate the number of gigabytes you’re going to store in EFS. If it is 5GB, the total cost would be around $1.5/mo.
EFS backups are pretty cheap. For Oregon it is $0.05 per GB/mo. The AWS Backup service allows to create daily backups with configurable retention period. Multiply your storage size with the backup cost in your region and with the number of days you want to keep your backups to get the total. For Oregon 5Gb of data stored for 5 days would be: 5$0.055= $1.25
Example subtotal:
- Web server and Service EC2 Instances: $25.29/mo
- ELB (no LCU cost included): $16.43/mo
- EFS for 5GB + backup with 5 days retention period: $2.75
- Subtotal: $44.47/mo
Cost of RDS
The Relational Database Service cost includes the computing cost (RDS instance) and DB storage cost. Compare your MySQL server configuration with the RDS DB instance classes from this page and find the hourly cost for that instance class in your region on the RDS Pricing page in the On-Demand DB section. Whether to use the Multiple Availability Zone Deployment is up to you. This feature adds failover functionality to your database, but it also makes the service price twice as high. If you chose the Single-AZ db.t3.small class in Oregon, it would be $0.034/mo.
For the database storage, it’s $0.115 for GB per month for Oregon, for a General Purpose SSD Storage. RDS recommends to provision at least 100GB of storage for the best performance.
The database backups are not included into this calculation - a lot of RDS backup space is provided for free by AWS, and if you need to make more snapshots, it would be $0.095 per GB/mo.
Example subtotal:
- Web server and Service EC2 Instances: $25.29/mo
- ELB (no LCU cost included): $16.43/mo
- EFS for 5GB + backup with 5 days retention period: $2.75
- RDS t3 small instance + 100GB storage, single AZ: $36.32
- Subtotal: $80.79/mo
Cost estimation conclusion
The example total of $80.79/mo for basic infrastructure could seem high when compared with another provider’s VPS, but remember that this is a cost of a high-availability cloud solution, with virtually unlimited scaling capabilities. All services in the solution are managed by AWS, which simplifies the maintenance and mitigates risks related with faulty hardware. After implementing the rough infrastructure design, you can work on the cost optimization and reduce your AWS monthly bills. We will give some ideas for the cost optimization later in this series.
Choosing the provisioning and orchestration tool
When you build an infrastructure on AWS you have at least 4 ways to launch and configure the services:
- Manually.
- AWS Elastic Beanstalk.
- AWS OpsWorks.
- AWS CloudFormation.
- Third-party configuration services, e.g. Terraform.
Although the manual way is good for exploring AWS features, we do not consider it as a recommended long-term option for any real infrastructure management.
There seem to be good third-party services, but in this tutorial we are focusing solely on the native AWS services.
Three other AWS options - Elastic Beanstalk, OpsWorks and CloudFormation basically provide the same features - they all can be used to define and manage an infrastructure. The difference is in the level of abstraction those services add above the basic AWS API level. If you google for “beanstalk vs opsworks vs cloudformation” you will find many pages comparing the services.
Both Elastic Beanstalk and OpsWorks seem to be simple on the surface, but at the same time developers should learn the abstractions introduced by these services. In addition OpsWorks uses Chef for configuring the services, which can be overkill for a simple infrastructure.
CloudFormation is a tool of our choice for the following reasons:
- CloudFormation defines the entire infrastructure as a single file - JSON or YAML, which we can manage with a version control system.
- Using the same template file we can deploy a similar stack on another AWS account, or create another stack in the same account, and this will take just a few minutes. Having another stack could be handy if you want to upgrade the infrastructure.
- Both JSON and YAML are well known languages, so we don’t need to learn new languages or abstractions.
- To define the infrastructure with CloudFormation, we should refer only to the low-level resource documentation which describes the core properties of AWS services. By reading that documentation we not only can learn how to define those resources with CloudFormation, but also get a lot of information about the resources themselves.
- We feel that CloudFormation perfectly fits October’s motto of “Getting Back to Basics”.
AWS CloudFormation basics
In a nutshell, CloudFormation is an AWS service, which takes a template file (JSON or YAML) and creates a stack. A CloudFormation stack includes all services or resources defined in the template file. In the template you can describe AWS resources, their configuration and dependencies between resources. After creating the stack, you can update it by uploading new versions of the template file, or changing the stack input parameters. When you update an existing stack, CloudFormation tries to apply changes without replacing your resources, although in some cases you can’t avoid it. Later in this tutorial we will explain how to protect important resources, such as the RDS database or Elastic File System from accidental replacement or removal.
This is a basic CloudFormation template syntax:
{
    "AWSTemplateFormatVersion": "2010-09-09",
    "Description": "October CMS demo infrastructure.",
    "Parameters": {
    },
    "Mappings": {
    },
    "Resources": {
    },
    "Outputs": {
    }
}
The Parameters section defines input parameters, which you can set when you create or update a stack. For example, instead of hard coding the web server instance type in the template code, you can make it a configurable input parameter.
The Mappings section defines key-value maps for various template needs. Mappings can add a lot of flexibility to templates, especially if you are designing a universal cross-region template. For the sake of simplicity we won’t be using mappings in this tutorial. You can read about them on the CloudFormation documentation page.
In the Resources section we can define all the resources required for the stack, such as the load balancer, RDS instance, EC2 instances, etc. AWS provides great documentation for all resource types, as well as CloudFormation template snippets for various use cases. For example, take a look at EC2 Instance documentation page. This page describes all the properties available for the EC2 Instance resource type and CloudFormation snippets and examples. It makes the infrastructure definition process rather simple - we just need to read the documentation, add new resources and dependencies, test the stack and repeat until we have a final product.
The Outputs section defines output values of the stack. They are evaluated by CloudFormation during the stack building process and become available at the end. For example, you can receive the load balancer identifier through an output parameter. Outputs are handy for further infrastructure automation, but in this tutorial we won’t use them. You can learn more about outputs from this page.
The template schema supports more top-level properties, but to make this template digestible, we will avoid using them. For the same reason we will only use the us-west-2 (Oregon) region in the template. It is possible to make a multi-region template but that is beyond the scope of this tutorial.
In the tutorial we will use JSON to define the template. If you are more comfortable with YAML, you can convert JSON template to YAML template using the CloudFormation Designer. As a side note, CloudFormation Designer is not something that we recommend to use for making or analyzing templates. The graphical representation generated by that tool for any more or less complex infrastructure only adds complexity and does not help us much.
Quick review of AWS services used in the infrastructure
For your reference, this is a full list of resource types that we are going to use. We will use some of them in this post, and others - later in the series. We will provide more details on each of the resource type.
- AWS::IAM::Role and AWS::IAM::Policy - defines roles and policies in the AWS Identity and Access Management (IAM) system. We use IAM roles to allow EC2 instances to write logs to the CloudWatch monitoring system.
- AWS::IAM::InstanceProfile - creates an IAM instance profile which associates IAM roles with EC2 instances.
- AWS::Logs::LogGroup - defines a Log Group in the AWS CloudWatch monitoring system. Our stack will push all logs to a single log group. This resource also sets the logs retention period.
- AWS::EC2::VPC - defines the AWS Virtual Private Cloud, which is a logically isolated virtual network with its own internal IP address range. All other resources defined in the template run inside a VPC.
- AWS::EC2::Subnet - defines a subnet, a logical division of the VPC network. Different subnets can have different access rules. For example, it’s best practice to put database instances in a subnet that cannot be accessed from the outside world, so that only web server instances can access them.
- AWS::RDS::DBSubnetGroup - defines a subnet group for the RDS database instance. Although we don’t enable the Multi-AZ feature for the database in this tutorial, we still must use at least two subnets to run the RDS instance.
- AWS::EC2::InternetGateway - defines an Internet gateway which allows services running inside a Virtual Private Cloud to communicate with the Internet.
- AWS::EC2::VPCGatewayAttachment - attaches Internet gateway to a VPC.
- AWS::EC2::RouteTable, AWS::EC2::Route and AWS::EC2::SubnetRouteTableAssociation - define routing rules allowing Internet traffic to access public subnets inside our VPC.
- AWS::EC2::SecurityGroup and AWS::EC2::SecurityGroupIngress - define a virtual firewall determining which ports and protocols can be used to access instances inside a VPC.
- AWS::EFS::FileSystem - defines the Elastic File System (EFS).
- AWS::RDS::DBInstance - defines the RDS database instance.
- AWS::EFS::MountTarget - defines a EFS mount target, that can be used to mount EFS file system to EC2 instances.
- AWS::AutoScaling::LaunchConfiguration - creates the launch configuration for EC2 instances managed with the Auto Scaling group.
- AWS::AutoScaling::AutoScalingGroup - defines an Auto Scaling group which starts and stops EC2 instances depending on the scaling policies.
- AWS::AutoScaling::ScalingPolicy - determines how many instances the Auto Scaling group must add or remove when it scales up and down.
- AWS::CloudWatch::Alarm - creates Cloud Watch alarms, which can trigger auto scaling actions. In our infrastructure we use four alarms for monitoring the low and high CPU or memory utilization on the web server EC2 instances.
- AWS::ElasticLoadBalancingV2::LoadBalancer - creates the Application Load Balancer, which distributes incoming traffic across web server EC2 instances.
- AWS::ElasticLoadBalancingV2::Listener - defines Load Balancer listeners which forward incoming traffic to the Target Groups which include web server instances. In our infrastructure we use two listeners - for HTTP and HTTPS protocols.
- AWS::ElasticLoadBalancingV2::TargetGroup - creates a load balancing Target Group. Target groups route requests to the registered EC2 instances, watch their health and provide client session stickiness.
- AWS::CloudWatch::Dashboard - creates the Cloud Watch Dashboard and dashboard widgets. The dashboard allows to monitor the infrastructure status, such us the database load or the number of active web server instances, in real time.
Part 1 - Network setup and Staging web server
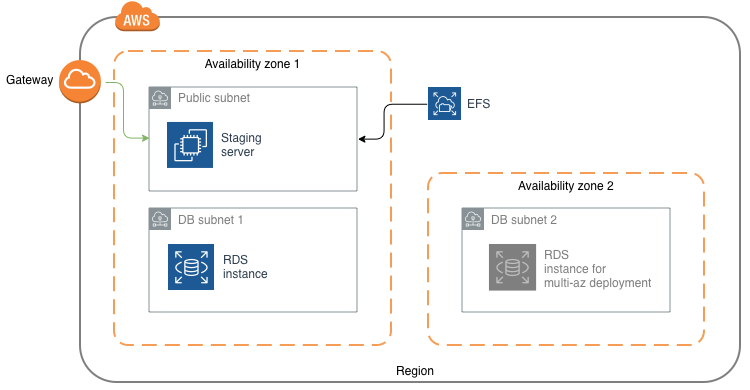
The goal of Part 1 of this tutorial is to define the basic infrastructure which includes the network configuration and an EC2 instance representing the Staging web server. In the next article we will install and configure web server software and October CMS on that instance. The Part 1 infrastructure will include the VPC, public subnet, two subnets for the database server, RDS database server and EFS file system.
Staging server explained
The Staging web server is going to be a copy of the production web services, but not included into the load balancer target group. This means that the production traffic will not be hitting the Staging server and we can use it for testing application and server updates. This gives us some great opportunities, when comparing it to running a website on a single server:
- The operating system packages or even the operating itself can be safely updated and tested on the Staging server without affecting the production network. Staying current with the software updates is the security best practice.
- We can update the web server configuration, for example update the PHP version or add required PHP extensions.
- Finally, we can update and test the October CMS application, for example update the October core, third-party plugins, your own theme repositories or plugins.
After updating and testing the Staging server you can create an Amazon Machine Image (AMI) from the stopped Staging instance and then use that image to update the stack and replace the production servers. The CloudFormation supports the so-called rolling updates, which keep a number of running instances while new instances are being initialized. This ensures that there are always web servers running and handling the incoming requests. We will give more details on the application updating process later in the series.
Creating the AWS account
If you don’t have an AWS account, it’s time to create it. You can do it on this page: https://aws.amazon.com/. Note, that Amazon retail buyer and AWS accounts are actually the same account, so if you are going to use AWS infrastructure for business, it is better to sign up for a new account.
If you want to import your production database from your other server, make sure to protect your AWS account and follow the best security practices:
- Use strong passwords.
- Enable Multi-Factor Authentication (MFA) for the root account.
- Create another administrator IAM account with enabled MFA and use that account for setting up your infrastructure.
- Do not use the root account for anything except a few operations requiring root credentials.
If you register a new AWS account, for the requirements of this tutorial, you should be able to use the Free AWS Tier.
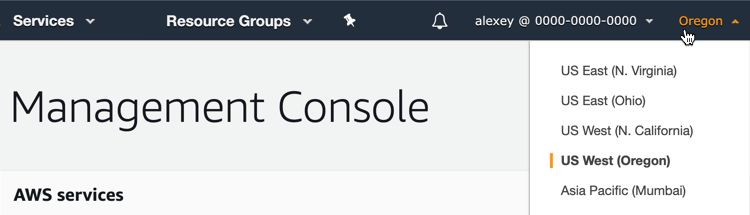
Choose the proper region before you start
For this tutorial we will use the Oregon region. Select it from the drop-down menu in the top right corner of the AWS console page:
Creating the SSH Key Pair
Before we continue, you must create a key pair in order to configure SSH access to the EC2 instances you run in the AWS cloud. You can create a new key pair using AWS console or import your existing public key.
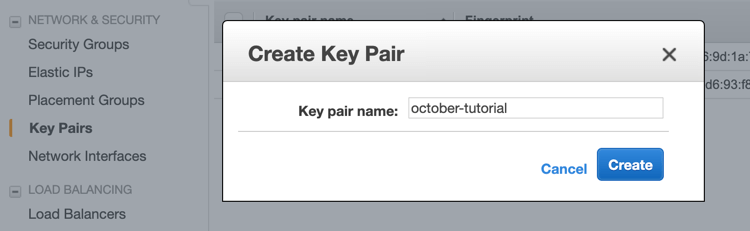
To create a key pair log into your AWS account and go to the Services / EC2 page. Select Key Pairs in the sidebar and click the Create Key Pair button. Enter a meaningful name for the keypair, for example october-tutorial and click Create.
At this point the browser will try to download the private key. This is the only time that you can download that file. Save it to the directory where you normally keep your private keys, for example to ~/.ssh on Mac and Linux machine, and update permissions to forbid access for other users and groups. You can read the details here.
The process of importing an existing public key is described on this page
The CloudFormation template for Part 1
This is a CloudFormation template for Part 1:
Let’s review the stack input parameters defined with the Parameters object. All parameters defined in that object are referred in the Resource definitions.
- KeyName - specifies which public key to install on the web server EC2 instances. When you create a new stack from the template, you will be able to select an existing key which you created in the previous step.
- StagingInstanceType - specifies which EC2 type to use for the Staging instance. For that parameter we intentionally limited the list of allowed values with the t2 family instance types. We want the template code to be short and readable.
- DBName - specifies a name for the RDS MySQL database. A database with a specified name will be created on the RDS instance.
- DBUser - specifies a name for the MySQL user to be created and associated with the database.
- DBPassword - specifies a password for the MySQL user.
- DBClass - specifies a class (capacity) for the RDS instance.
- DBAllocatedStorage - specifies the size of the database storage. Amazon recommends to allocate at least 100 Gb for the general-purpose SSD storage to avoid latencies.
- StagingImageId - EC2 AMI image for the Staging instance.
Now let’s review the resources. We will cover only the most important resource properties.
The main resources that define the network are the Virtual Private Cloud, 3 subnets, Internet Gateway, security groups and the route table. You can read more about VPC and subnets in this documentation article. This video tutorial on AWS VPC and networking is highly recommended.
VPC resource, defines the private network which hosts almost all other stack resources:
"VPC": {
    "Type": "AWS::EC2::VPC",
    "Properties": {
        "CidrBlock": "10.0.0.0/16",
        "EnableDnsSupport": true,
        "EnableDnsHostnames": true,
        "Tags": [{
                "Key": "Application",
                "Value": {
                    "Ref": "AWS::StackId"
                }
            },
            {
                "Key": "Name",
                "Value": "October CMS VPC"
            }
        ]
    }
},
The CidrBlock property defines the range of IP addresses the private cloud covers. The value of that parameter is a string in CIDR notation. See also this video explaining the CIDR notation. For configuring complex networks you can use the CIDR calculator to figure out how many bits to reserve for the subnet mask. The value we use in the example (10.0.0.0/16) allows to allocate more than 65 thousands of subnets, which is more than enough.
The tags property, which is defined in many resources, are just for convenience - tags simplify identifying resources in the AWS console. Tags can also be used for the infrastructure automation, but this is out of scope for this tutorial.
PublicSubnet resource - defines the public subnet. Resources in the public subnet are accessible from the external world, which is achieved with the gateway and route table defined later in the Resources section.
"PublicSubnet": {
    "Type": "AWS::EC2::Subnet",
    "Properties": {
        "VpcId": {
            "Ref": "VPC"
        },
        "MapPublicIpOnLaunch": "true",
        "CidrBlock": "10.0.1.0/24",
        "AvailabilityZone": "us-west-2a",
        ...
    }
},
The important properties of the subnet are:
- VpcId - refers a VPC the subnet belongs to.
- MapPublicIpOnLaunch - determines whether a public IP address must be associated with EC2 instances in the subnet, when they launch. We need this in order to connect to EC2 instances directly.
- CidrBlock - specifies the range of IP addresses the subnet covers. Note that the subnet IP range must be within the VPC IP range. In our case we use the 10.0.1.0/24 value, which allows 254 IP addresses within the subnet.
- AvailabilityZone - specifies the availability zone the subnet belongs to. You can read about availability zones in this documentation article. As we mentioned earlier, this demo infrastructure is defined in the us-west-2 (Oregon) region. This region has 3 availability zones: us-west-2a, us-west-2b, us-west-2c. For the public subnet we just chose the first availability zone.
DBSubnet1 and DBSubnet2 - define two subnets for the RDS MySQL instance. The RDS instance requires at least two subnets in different availability zones. This is needed for the multi-az RDS deployment. For the simplicity and cost efficiency, we do not enable the multi-az feature in the template, but you can do it either by updating the template, or manually from the AWS console. The important properties of the database subnets are:
- CidrBlock - specifies IP address range for the database subnets. Note that they do not overlap with the public subnet IP address range.
- AvailabilityZone - for the availability zone we use the Fn::Select intrinsic function, just for the demonstration purposes. It basically selects an availability zone by its index from the list of zones returned by another function Fn::GetAZs. The latter function returns a list of availability zones in the stack region.
DBSubnetGroup - defines a group of two database subnets. This resource is used as an input parameter for the DBInstance resource created further in the template. The two DB subnets are referred in the SubnetIds property.
InternetGateway - defines an Internet gateway which is used by to connect the private cloud to the Internet. This resource does not have any important properties and is referred in the Gateway Attachment and Access Route resources further in the template.
AttachGateway - attaches internet gateway to the VPC. The resource has two mandatory properties - a reference to the VPC resource and a reference to the Internet gateway.
InternetAccessRouteTable - defines traffic route table and attaches it to the VPC. Route tables define where network traffic is directed. Each subnet must be associated with a route table. Each route table can have multiple routes. The resource itself is referred in the Route and Subnet Route Table Association resources. Note that this route table is attached only to the public subnet. The database subnets use the default route table created by AWS in the VPC. The default route table allows only local VPC traffic. The only property we use for that resource is the VpcId, which refers to the VPC.
InternetAccessRoute - defines a single route within a route table. The important properties of the route are:
- RouteTableId - a reference to the parent route table.
- GatewayId - a reference to the Internet gateway.
- DestinationCidrBlock - defines a range of IP addresses allowed by the route. As we are defining a route for the Internet traffic, the CIDR value is 0.0.0.0/0, which covers all possible IP addresses.
- DependsOn - defines a dependency of that resource on the Attach Gateway resource. You must use the DependsOn attribute in some cases when you define CloudFormation resources. In this case the documentation explicitly says: “For route entries that specify a gateway, you must specify a dependency on the gateway attachment resource.”. In other cases you have to use the attribute to define the order in which resources are created and removed. CloudFormation tries to manage the resource creation order automatically, but this is not always possible without your explicit help.
PublicSubnetRouteTableAssociation - defines the association between the route table and the public subnet. By default all subnets created in the VPC are associated with the default local route table, but we want the public subnet to be associated with our Internet access route table. This resource replaces the default association. The mandatory parameters of this resource are the references to the public subnet and the route table.
WebServerSecurityGroup - defines a security group for your web server instances. Security groups are virtual firewalls which define from which IP addresses and by which protocols and ports your EC2 instances can be accessed.
"WebServerSecurityGroup": {
    "Type": "AWS::EC2::SecurityGroup",
    "Properties": {
        "GroupDescription": "Enable SSH access via ports 80 and 22",
        "SecurityGroupIngress": [{
                "IpProtocol": "tcp",
                "FromPort": "22",
                "ToPort": "22",
                "CidrIp": "0.0.0.0/0"
            },
            {
                "IpProtocol": "tcp",
                "FromPort": "80",
                "ToPort": "80",
                "CidrIp": "0.0.0.0/0"
            }
        ],
        "VpcId": {
            "Ref": "VPC"
        },
        ...
    }
},
We want the web servers to be accessible on the ports 80 and 22 (for the SSH) from all IP addresses. Allowing SSH access from any IP address is not a good security practice, but you should be able to extend this demo template with another input parameter specifying the CIDR block for the allowed SSH IP range. The rules are defined with the SecurityGroupIngress property, which lists possible protocols, ports, and CIDR ranges.
MountTargetSecurityGroup defines another security group, for the EFS file system. This security group allows TCP traffic on the standard NFS port 2049. Note that in this case instead of specifying the IP range we use the SourceSecurityGroupId property, which refers to the WebServerSecurityGroup. This allows web server EC2 instances to connect to the EFS file system.
DBSecurityGroup creates a security group for the RDS MySQL instance. It opens the port 3306 for the access from the web server security group, allowing web server instances to connect to the database. Similarly to the mount target security group, we provide a reference to the WebServerSecurityGroup instead of specifying an IP range with CIDR.
FileSystem - this resource creates the EFS file system. The only interesting property defined in that resource is the PerformanceMode, which sets the General Purpose performance mode.
DBInstance resource creates the RDS MySQL instance.
"DBInstance": {
    "Type": "AWS::RDS::DBInstance",
    "Properties": {
        "DBName": {
            "Ref": "DBName"
        },
        "MasterUsername": {
            "Ref": "DBUser"
        },
        "MasterUserPassword": {
            "Ref": "DBPassword"
        },
        "Engine": "MySQL",
        "DBInstanceClass": {
            "Ref": "DBClass"
        },
        "AllocatedStorage": {
            "Ref": "DBAllocatedStorage"
        },
        "StorageType": "gp2",
        "VPCSecurityGroups": [{
            "Fn::GetAtt": ["DBSecurityGroup", "GroupId"]
        }],
        "DBSubnetGroupName": {
            "Ref": "DBSubnetGroup"
        },
        ...
    }
},
The resource has several important parameters:
- DBName - specifies the database name. In our template this property refers to the DBName input parameter, allowing you to provide the database name when you create the stack in the AWS console.
- MasterUsername - database username, refers to the DBUser input parameter.
- MasterUserPassword - database user password, refers to the DBPassword input parameter.
- Engine - specifies the database engine, in our case it is MySQL.
- DBInstanceClass - defines the class (capacity) of the database instance. This property refers to the DBClass input parameter.
- AllocatedStorage - storage to allocate for the database, refers to the DBAllocatedStorage input parameter.
- StorageType - specifies the database storage type. In our case it is “gp2”, which means General Purpose SSD storage. You can read about other database storage types here
- VPCSecurityGroups - specifies a security group to associate with the database instance. In our template it refers to the DBSecurityGroup resource, created earlier in the template.
- DBSubnetGroupName - specifies a subnet group to run the RDS instance in. In the template it refers to the DBSubnetGroup resource created earlier.
MountTarget defines a mount target for the EFS file system. Mount targets are required for EFS in order to be mounted on EC2 instances. As you might already noticed, the FileSystem resource defined above does not have any properties which would specify in what subnet it should be available and what security groups manage its traffic. The mount target resource has references to the EFS file system, to the subnet and security group defined earlier:
"MountTarget": {
    "Type": "AWS::EFS::MountTarget",
    "Properties": {
        "FileSystemId": {
            "Ref": "FileSystem"
        },
        "SubnetId": {
            "Ref": "PublicSubnet"
        },
        "SecurityGroups": [{
            "Ref": "MountTargetSecurityGroup"
        }]
    }
},
And finally the StagingInstance resource creates a EC2 instance, which acts as the Staging web server.
"StagingInstance": {
    "Type": "AWS::EC2::Instance",
    "Properties": {
        "ImageId": {
            "Ref": "StagingImageId"
        },
        "KeyName": {
            "Ref": "KeyName"
        },
        "InstanceType": {
            "Ref": "StagingInstanceType"
        },
        "NetworkInterfaces": [{
            "AssociatePublicIpAddress": "true",
            "DeviceIndex": "0",
            "GroupSet": [{
                "Ref": "WebServerSecurityGroup"
            }],
            "SubnetId": {
                "Ref": "PublicSubnet"
            }
        }],
        ...
    },
    "DependsOn": ["FileSystem", "MountTarget"]
}
It has a few important properties:
- ImageId - specifies the Amazon Machine Image (AMI) identifier. In the template this value is provided via the input parameter StagingImageId.
- KeyName - specifies the key pair name and refers to the KeyName input parameter. When you create a stack from this template, CloudFormation will allow you to choose a key pair from a drop-down list. The selected public key will be installed on the EC2 instance, so that you can SSH into it.
- InstanceType - specifies the EC2 instance type and refers to StagingInstanceType input parameter. The instance type defines the computing power of the instance.
- NetworkInterfaces - this property configures the Staging instance network interface. It specifies that the interface must have a public IP address, so that we can access it from the outside of the private cloud. In addition it binds the instance to the web server security group (WebServerSecurityGroup) and the public subnet (PublicSubnet).
That’s all resources needed to create a foundation infrastructure for our future scalable cloud solution. If you got bored with reading these template descriptions, get ready for some fun in the next section where we will finally run the template and create the stack!
Creating the CloudFormation stack from the template
Let’s now create our demo October CMS stack. Before we begin, we should find our Amazon Machine Image (AMI) identifier which will serve as a foundation image for our web server. It should be a basic operating system, which we will extend with installing a web server, PHP, all other required packages and October CMS. This is the only time when we use a clean OS image provided by AWS, for further updates we will use the our own image, generated from the Staging instance.
Sign into your AWS account and go to the Services / EC2 in the top menu. Navigate to the Instances page using a link in the sidebar. Click Launch Instance. On the Quick Start page you will see a list of basic images. We are looking for the Amazon Linux 2 AMI, usually it is on the top of the list. Select and copy the AMI identifier for the 64-bit x86 architecture, we will need this value later.
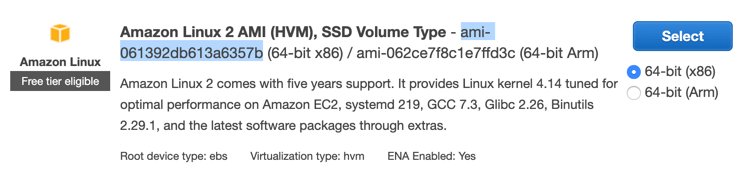
The reason why we use Amazon Linux 2 is that it is specially developed by the AWS team to provide high performance in the AWS cloud environment. It includes all packages required for integrating with other AWS services and has a proper security configuration by default. You can use other Linux distributions available in AMIs, if you like. In this tutorial all OS commands are written for Linux 2.
After obtaining the AMI ID, go to the Services / CloudFormation page from the top menu. At the moment AWS is rolling out a new user interface for the CloudFormation, which can be enabled or disabled. Feel free to switch to the newest UI. All screenshots and explanations hereafter assume that you use the new user interface.
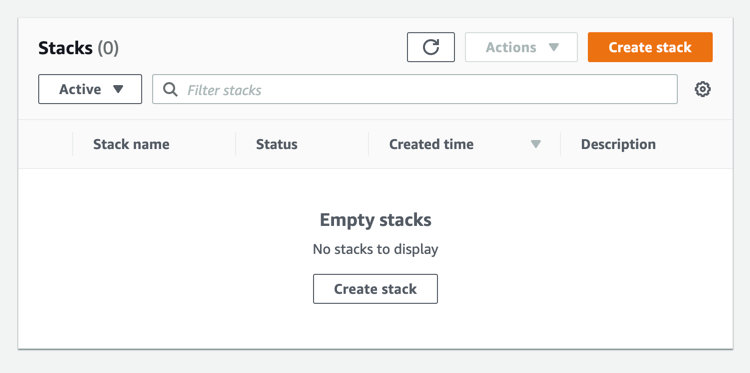
Click the Create stack button above the stack list, select Template is ready and Upload a template file options. Upload the stack template and click Next.
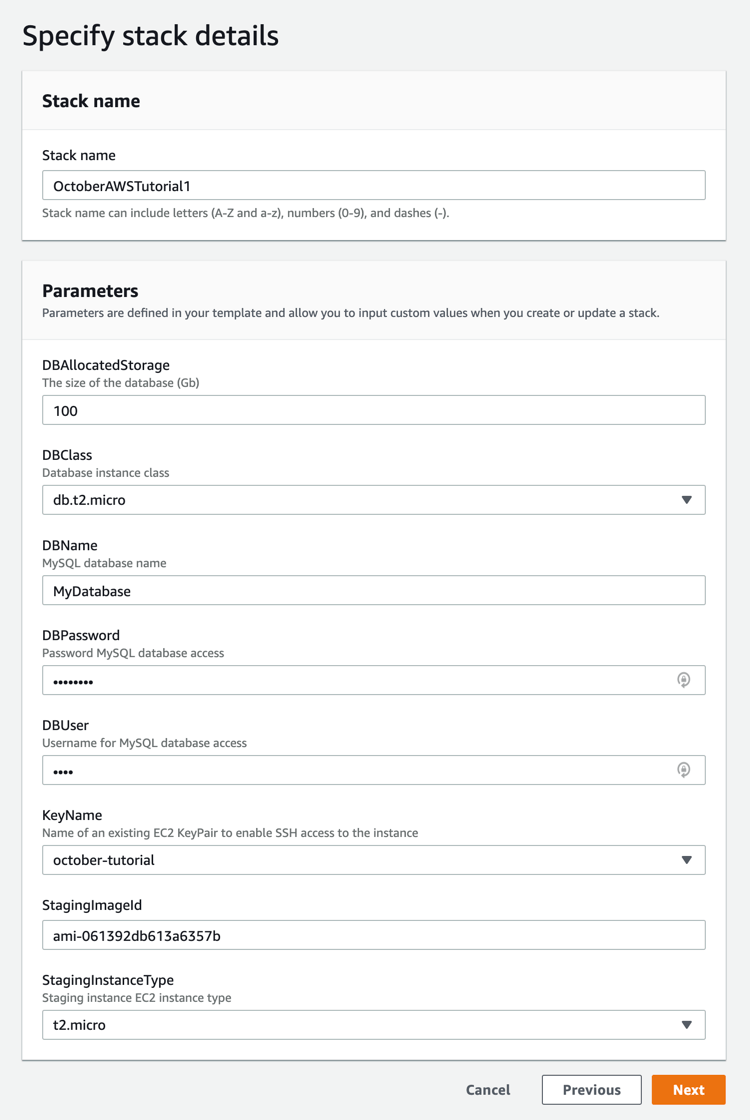
On the Stack Details page you need to provide the stack name - enter something like OctoberAWSTutorial1. The Parameters table shows all the parameters defined in the template, with default values, where applicable. Enter values in the DBPassword and DBUser fields, these will be used later when setting up the database. We are creating a new database, so even if you are going to import an existing database dump, feel free to use new database password and user name. Select a key pair created for this tutorial in the KeyName field. For the StagingImageId paste the AMI ID which you copied earlier. When you paste parameters, make sure to remove trailing or leading spaces if you accidentally copied them. Click Next.
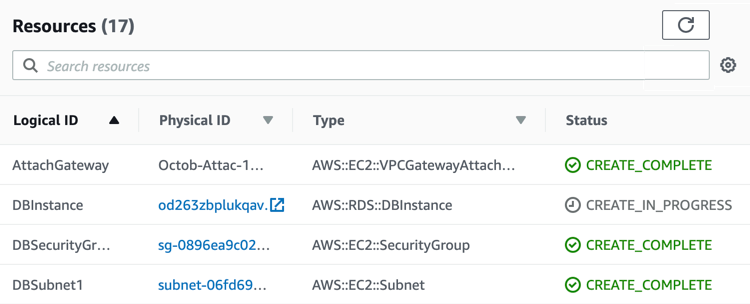
Our stack does not require other options. You can quickly review the Configure stack options page and go to the last step - Review. Click Create stack button. You will be redirected to the Stack details page, which displays the stack Events, Resources and other information. You can check the Resources page and keep updating it with the Refresh button until you see that all resources have been created. In the current demo template the DBInstance resource usually takes the longest time.
When the process finishes, you can go to the Stack info tab and update it to make sure that the Stack status has changed from CREATE_IN_PROGRESS to CREATE_COMPLETE.
Congratulations, you just created your first October CMS stack!
Reviewing the created stack resources
Now that the stack creation has completed, we can check which resources were created. There are two ways to get to the details page for the resources created by the stack. First, you can click resource identifiers right on the stack Resources tab. This opens the resource page in another browser tab. Another method is to go to the corresponding resource type page from the top menu.
For example, click the StagingInstance identifier on the stack’s Resources tab. This will open the EC2 / Instances page, with the Staging instance selected. Be aware, that this method automatically applies a list filter and shows only a single resource, which you clicked on the Resource tab. This means that if you have multiple EC2 instances running, you can overlook them. Fortunately it’s easy to remove the list filters.

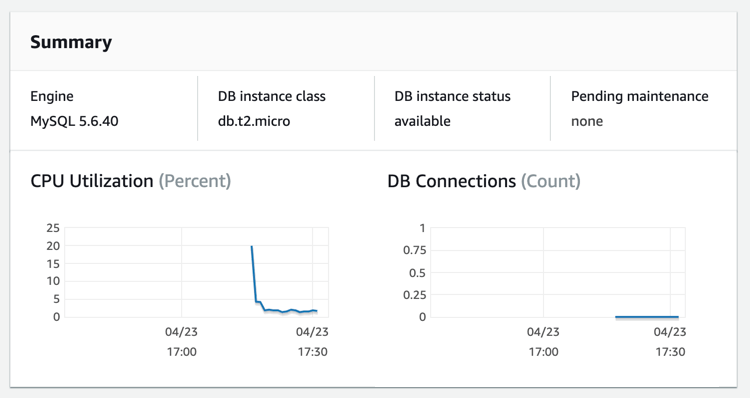
Keep clicking different resource types on the stack’s Resources tab and review their details pages. The DB instance details page provides some information about the instance health and load:
You will notice that some resource types are not clickable on the stack’s Resources page. Some of the non-clickable resources are just configuration records for other resources, and they don’t have dedicated pages. However the EFS resource does have a dedicated page, but it there is no link to that page from the stack’s Resources tab. You can access the EFS page from the Services / EFS page. Click the October CMS file data file system in the list to see its details.
Logging into the Staging instance
The Staging EC2 instance was automatically launched when you created the stack. Let’s log into it with SSH and see if it works.
If you use macOS or Linux, you can use the ssh command. In order to log into your EC2 instances, you must use the private key that you created and downloaded earlier. You can specify the private key path every time you execute the ssh command, but it is simpler to add the private key to the SSH agent.
First, update the private key permissions. Assuming that the key is in ~/.ssh/october-tutorial.pem:
chmod 400 ~/.ssh/october-tutorial.pemNow you can add the key:
ssh-add -K ~/.ssh/october-tutorial.pemTo obtain the Staging server IP address go to the EC2 / Instances page in your AWS account and click the Staging instance in the list. From the Description tab below the list, select and copy the IPv4 Public IP value. Use this IP address to log into the instance as ec2-user. This is a standard account for Amazon Linux instances:
ssh ec2-user@34.217.194.62When you connect to an instance for the first time, you will see the standard warning “The authenticity of host XXX can't be established.” Answer yes to connect. Upon the successful login you will see the standard Amazon Linux greeting:
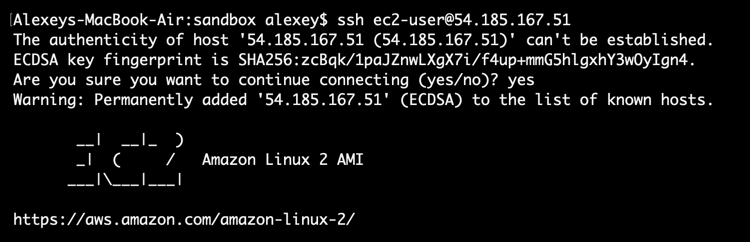
Congratulations!
The process is a bit different for Windows. Fortunately, AWS provides documentation on using PuTTY.
Checking the EFS and database connectivity
To finish this part of the tutorial, let’s check that we can mount the EFS volume and connect to MySQL server from the Staging instance.
The fresh Amazon Linux 2 installation does not have a package required for mounting EFS volumes, so we must install it first. Assuming you’re still connected to the Staging instance, run this command:
sudo yum install -y amazon-efs-utilsThis will install the EFS utils. Now let’s create a directory which will be used as a mount point:
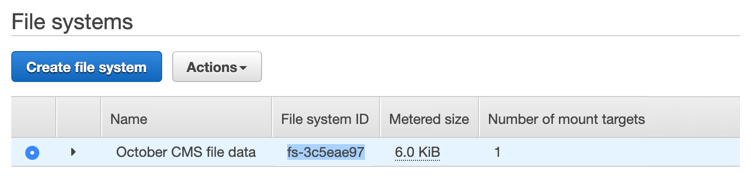
sudo mkdir /mnt/efsTo connect to the EFS we must know its identifier. Go to the AWS console and open the Services / EFS page. Find October CMS file data file system in the list and copy its File system ID.
Return to the SSH terminal and execute the mount command. Make sure to replace the file system identifier with the one you copied:
sudo mount -t efs fs-xxxxxxx:/ /mnt/efsThe mounting process can take a second. When it finishes, you can try to create a file on the mounted volume:
sudo touch /mnt/efs/test.txtAnd check if the file was created:
sudo ls /mnt/efs/test.txtTo test MySQL connectivity we must first install MySQL package:
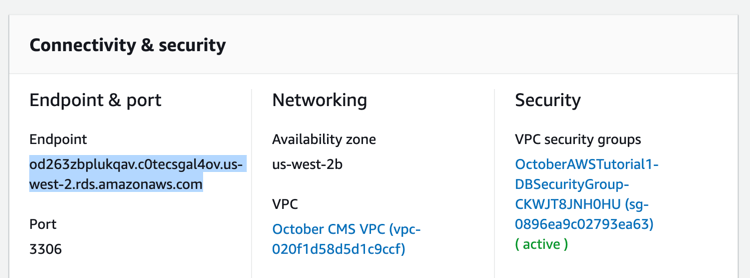
sudo yum -y install mysqlTo obtain MySQL server host name, go to the AWS console, open the Services / RDS page, click Databases link in the sidebar and then click the instance identifier in the list. Alternatively you can click the DBInstance identifier on the stack’s Resources tab. On the RDS instance details page find the Endpoint parameter and copy its value to the clipboard.
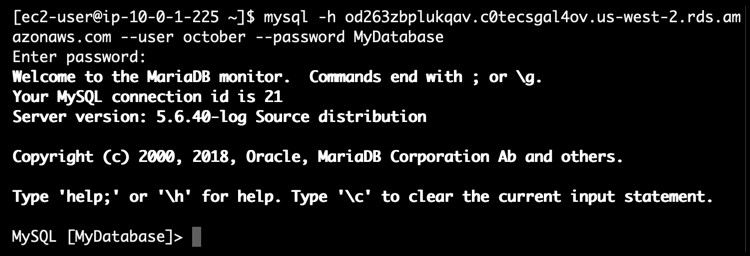
Return to the SSH terminal and execute the mysql command, making sure to replace the database host name with the copied value and the username and database name with the values you provided during the stack creation:
mysql -h YourEndPointURL --user october --password YourDatabaseNameYou will be asked to input MySQL user password, use the value that you entered when you created the stack.
If you did everything right, you will see the MySQL prompt.
Removing the test stack
Congratulations! Now you have the Staging instance, distributed file storage and MySQL server. In the next post we will explain how to configure the web server and install October CMS to the Staging instance and how to create your own AMI image that you will use for launching web server instances in the auto scaling environment.
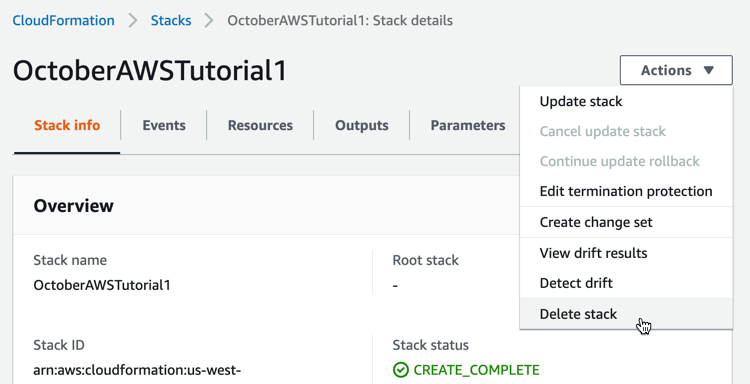
Feel free to continue exploring the stack. Don’t forget to remove it to avoid paying for resources that you don’t use. To remove the stack and all its resources, go to the Services / CloudFormation page, select your stack and click Actions / Delete stack. Make sure that the stack was actually deleted. The deletion process can take some time.
Thanks for reading this lengthy post! We hope it will help you to understand the AWS basics and build your own cloud solution for October CMS. Stay tuned for the next post in the series!