
This plugin allows you to create and design fully custom email campaigns and send them to end users. Campaigns can be sent to users who can sign up to mailing lists using a front-end component, or as part of a predefined collection of recipients, for example, all front-end users.
This table describes the moving parts found in this plugin:
| Object | Description |
|---|---|
| Campaign | A copy of the message sent to the subscriber. |
| Campaign Template | The HTML scaffolding template used by a Campaign. |
| Subscriber | An individual person, their email address and name. |
| Subscriber List | A mailing list that subscribers can opt-in to. |
| Recipient Group | Like a List but emails are generated by the system, for example All registered users. |
Launching a campaign
When you create a campaign for the first time, it will ask if you want to generate a default campaign template in the current theme. This will provide some sample content you can use to get started.
After naming your campaign, you are free to populate the message content as many times are you like. You can also preview the message by clicking the Send test message button.
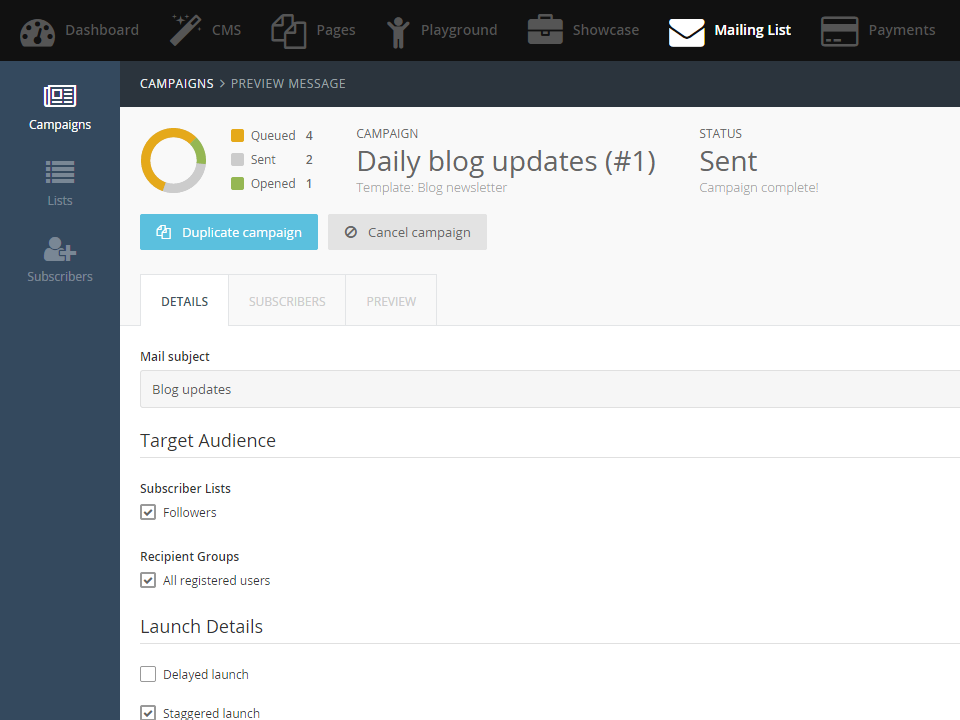
Once you are ready to send the message click the Launch campaign button where you can select which subscribers should receive the campaign message. There are also several launch options available:
-
Delayed launch - If this is checked, a date picker will appear and you can select an exact date and time to send the message. This is good for perfectly timing your campaign.
-
Staggered launch - If this is checked, the campaign subscribers will be divided in to smaller groups depending on the selected time period. Each group will be contacted every hour until all subscribers have been sent the message.
-
Repeating campaign - This option is particularly useful if you are generating the message content dynamically, for example, a message that contains the latest blog posts on your site. If this is checked, the campaign will duplicate itself after it has launched and automatically apply the Delayed launch option to match the repeating frequency. This will continue perpetually until you manually cancel the most recent iteration.
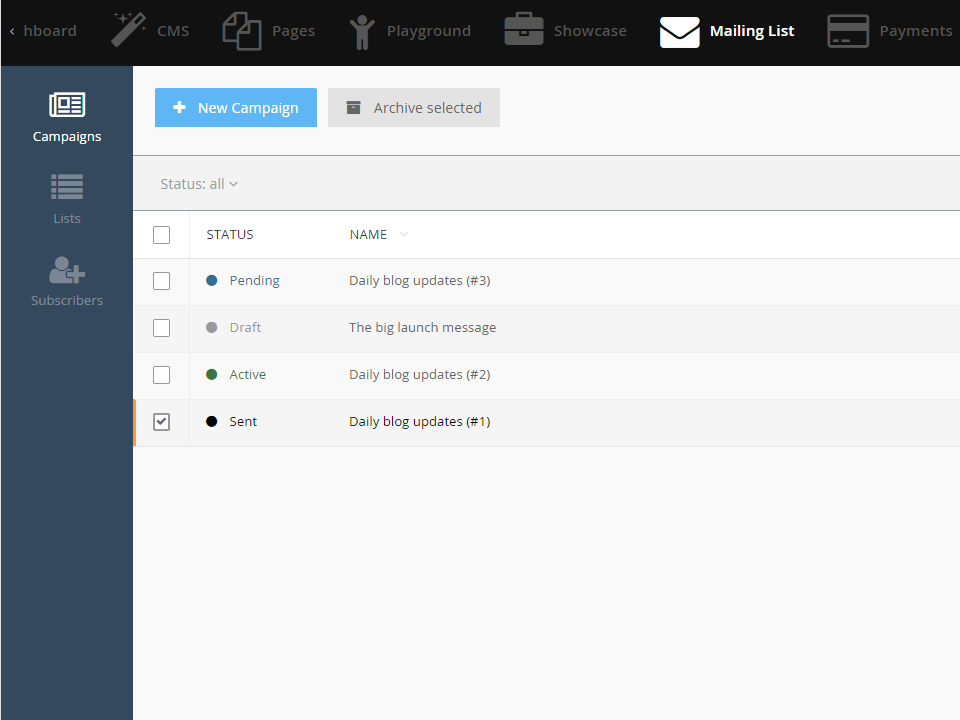
Campaign status meanings
A campaign will have many statuses through its life time, they are described in detail below:
-
Draft - the campaign is still having content added and the design may be changing. This is the only status where content can be modified.
-
Pending - for campaigns that use a delayed launch time, it will stay in this status until the specified launch date has passed. Campaigns in this status are checked every hour.
-
Active - campaign is in progress, there are messages still queued to be sent to the subscribers. Some subscribers may have received the message. Staggered campaigns may stay in this status for some time.
-
Sent - the campaign is complete, all subscribers should have received the message. Information about the subscriber is recorded, such as whether they opened the email or whether they unsubscribed because of this email.
-
Deleted - the campaign has been cancelled while it was active or before it reached the launch date.
-
Archived - the campaign is now old and doesn't need to be seen any more. All recorded about subscriber activity has been deleted.
System requirements
This plugin relies on the system schedule process for running its automated tasks. You should ensure that your cron table is configured correctly for this plugin to work. Alternatively you can manually process the campaign logic by calling php artisan campaign:run and run it every hour.


Installation via Command Line
php artisan plugin:install Responsiv.Campaign
Implementing a Frontend Subscription Form
Use the campaignSignup component to display a subscription form on a page. The component has the following properties:
- list - a campaign list code to subscribe the person to. Eg:
followers - confirm - if this is checked, subscribers must confirm their email address before they are added to the list.
Here is some sample markup:
title = "My page"
url = "/mypage"

[campaignSignup]
list = "followers"
confirm = 0
==
<div id="container">
    <form
        data-request="campaignSignup::onSignup"
        data-request-update="'campaignSignup::result': '#container'">

        <!-- Optional first name -->
        <input name="first_name" type="text" placeholder="First Name" />

        <!-- Optional last name -->
        <input name="last_name" type="text"  placeholder="Last Name" />

        <!-- Required email address -->
        <input name="email" type="text"  placeholder="john.smith@example.com" />

        <button class="btn btn-default" type="submit">Subscribe</button>

    </form>
</div>
Campaign Templates
Campaign Templates are managed in the CMS area and should be designed by a developer. Each template should use the campaignTemplate CMS Component and like any CMS page, they can support using other components for dynamically generating content.
title = "Default template"
url = "/campaign/message/:code"
description = "Campaign with basic fields"

[campaignTemplate]
==
<!DOCTYPE html PUBLIC "-//W3C//DTD HTML 4.01 Transitional//EN"
    "http://www.w3.org/TR/html4/loose.dtd">

    <html lang="en">
    <head>
        <meta http-equiv="Content-Type" content="text/html; charset=utf-8">
        <title>Newsletter</title>
    </head>

    <body>
        {richeditor name="body" size="huge"}{/richeditor}
    </body>
</html>
Dynamic Templates
By default the Campaign Template content will be static for every reader. This makes the campaign predictable and you can know exactly what was sent to each user, since they all receive the same thing.
In some cases you may want to send a custom and user-personalized content to each subscriber. This is possible with the isDynamic setting in the component.
[campaignTemplate]
isDynamic = "1"
When this setting is enabled, the template contents will be rendered once for each individual subscriber. In your components, you may access the subscriber object via the {{ campaignTemplate.subscriber }} Twig variable or via PHP with the following.
\Responsiv\Campaign\Components\Template::getDynamicSubscriber();
Note: Using dynamic templates will increase the database storage requirements since a copy of every email sent to every subscriber will be stored.
Supported Template Fields
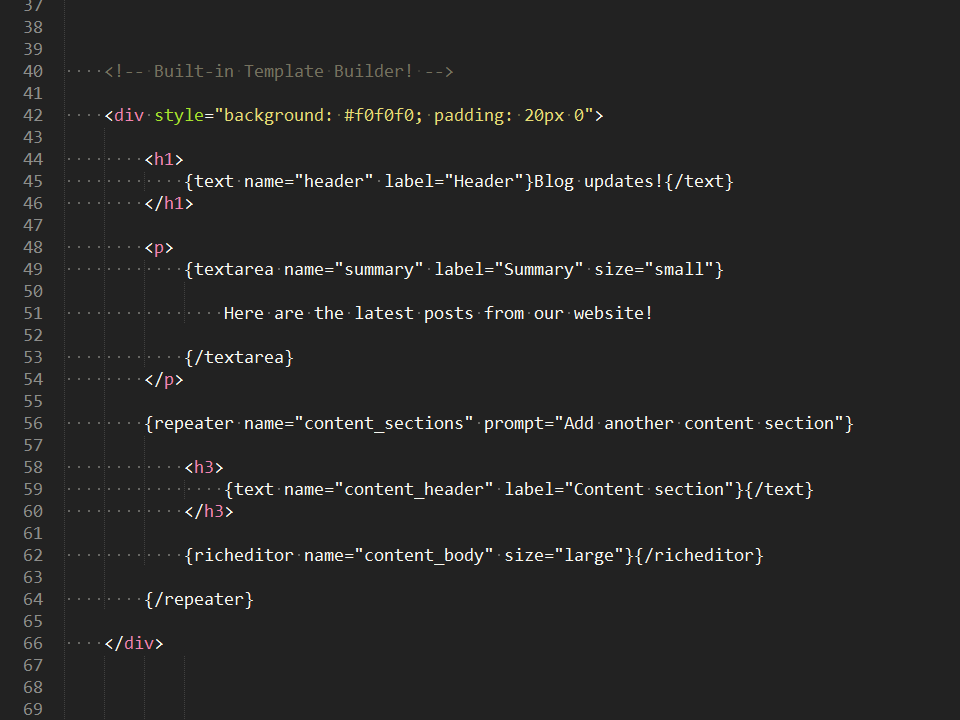
There is a template build syntax, this lets you add form fields inside the template where the content can be added via the Campaign creation process. These tags are supported:
Text
Renders a single line editor field for smaller blocks of text.
{text name="websiteName" label="Website Name"}Our wonderful website{/text}
Textarea
Renders a multiple line editor field for larger blocks of text.
{textarea name="websiteDescription" label="Website Description"}This is our vision for things to come{/textarea}
Rich Editor
Renders a WYSIWYG content editor.
{richeditor name="content" label="Main content"}Default text{/checkbox}
Markdown
Renders a Markdown content editor.
{markdown name="content" label="Markdown content"}Default text{/markdown}
File Upload
Renders a file upload editor field, the output value is the full path to the file.
{fileupload name="logo" label="Logo"}http://placehold.it/100x100{/fileupload}
Repeater
Renders a repeating section with other fields inside.
{repeater name="content_sections" prompt="Add another content section"}
    <h2>{text name="title" label="Title"}Title{/text}</h2>
    <p>{textarea name="content" label="Content"}Content{/textarea}</p>
{/repeater}
For more details on syntax fields, see the Parser section of the October documentation.
Creating New Recipient Groups
Plugins can extend the Campaign plugin with new recipient groups. These are like predefined subscriber lists that list their subscribers dynamically by the system. New groups are registered with the API events triggered by the Campaign plugin. The event handlers should be defined in the boot() method of the plugin registration file. There are three events that should be handled in the plugin.
responsiv.campaign.listRecipientGroupsevent handler should return a list of new recipient groups supported by the plugin.responsiv.campaign.getRecipientsDataevent handler "resolves" a recipient group information and returns the actual email and name of each subscriber.
The next example shows an event handler registration code for a plugin. The plugin registers two recipient groups. As you can see, the plugin uses the Customer class to handle the events. That's a recommended approach.
public function boot()
{
    Event::listen('responsiv.campaign.listRecipientGroups', function() {
        return [
            'my-plugin-all-customers' => 'All customers',
            'my-plugin-paid-customers' => 'Customers with paid orders',
        ];
    });

    Event::listen('responsiv.campaign.getRecipientsData', function($type) {
        if ($type == 'my-plugin-all-customers')
            return Customer::getAllCustomers();

        if ($type == 'my-plugin-paid-customers')
            return Customer::getPaidCustomers();
    });
}
Registering New Recipient Groups
New recipient groups can be registered with the responsiv.campaign.listRecipientGroups event handler. The handler should return an associative array with the type codes in indexes and the names in values. It is highly recommended to use the plugin name for the type code, to avoid conflicts with other plugins. For example:
[
    'my-plugin-recipient-type' => 'My plugin recipient type',
]
Returning Information About a Recipient Collection
Plugins should provide detailed information about the supported recipient types with the responsiv.campaign.getRecipientsData event handlers. The handler gets a single parameter - the recipient type code (one of the codes you registered with the responsiv.campaign.listRecipientGroups handler). The handler code must check whether the requested item type code belongs to the plugin. The handler should return an associative array in the following format:
[
    'recipients' => [
        'greatguy@domain.tld' => ['first_name' => 'Some', 'last_name' => 'Person'],
        'coolgal@domain.tld' => ['first_name' => 'Another', 'last_name' => 'Person'],
        // ...
    ]
]
Extending the Unsubscribe Event
You may hook the responsiv.campaign.beforeUnsubscribe event if you want to use your own logic called when a user unsubscribes. This event can override the default behavior by returning a response, which is then passed to the user's browser.
Event::listen('responsiv.campaign.beforeUnsubscribe', function(
    $component,
    $subscriber,
    $campaign
) {
    // ...
});
Capturing Extra Data / Meta Data
To capture meta data make sure the metaData property is enabled in the Signup component.
[campaignSignup]
metaData = 1
Then simply customize the component markup and pass custom data to meta[] HTML input array.
<form data-request="onSignup">
    <!-- ... -->

    <label>
        <input type="radio" name="meta[interest]" value="Sport" />
        Sport
    </label>
    <label>
        <input type="radio" name="meta[interest]" value="Games" />
        Games
    </label>
    <label>
        <input type="radio" name="meta[interest]" value="Dancing" />
        Dancing
    </label>

    <label>
        <input type="checkbox" name="meta[tell_me_more]" value="Yes" />
        Tell me more
    </label>

    <!-- ... -->
    <button type="submit">Subscribe</button>
</form>
The captured meta data will then be shown next to each subscriber in the back-end. Note: The column is invisible in the list view by default.
Extend Tags Available in the Content Editor
Plugins may extend the list of available tags that can be used in the editor, by registering the tag with the TagManager.
Create a function called registerMailCampaignTags() in your Plugin.php and return an array of tags to use in the content editor.
The following attributes are available:
tag: The name of the tag, used in the content editor like {tag_name}.value: The value for this tag. Must be a string, but may be a closure that returns a string. The closure gets a parameter$tagDatawhich includes the subscriber and message object and may be extended (see below).preview: The value that is used for generating the message preview. Must be a string, but may be a closure, just likevalue.description: A description for the tag, which is display as a tooltip on the tag legend in the content editor.
Example:
public function registerMailCampaignTags()
{
    return [
        'occupation' => [
            'value' => function ($tagData) {
                return $tagData->subscriber->meta_data['occupation']
            },
            'preview' => 'Web Developer',
            'description' => 'The subscribers occupation.',
        ],
        'city' => [
            'value' => function ($tagData) {
                return $tagData->subscriber->meta_data['city']
            },
            'preview' => 'Milan',
            'description' => 'The city where the subscriber lives.',
        ],
    ];
}
If you need to fetch the same data in the closures, you may also listen to the responsiv.campaign.extendTagdata event and extend the available tag data. This helps you keep the code a bit cleaner, if you have many different tags that access the same data.
When the event is fired, it provides a reference to the $tagData to which you may add your data objects. Dont forget the ampersand (&) in front of the $tagData parameter to get it by reference and add your data to it.
public function boot()
{
    Event::listen('responsiv.campaign.extendTagdata', function(&$tagData) {
        if ($tagData->subscriber && $tagData->subscriber->email) {
            $user = User::getByEmail($tagData->subscriber->email);
            if ($user) {
                $tagData->ordersQuery = $user->orders();
                $tagData->orders = $user->orders;
            }
        }
    });
}

public function registerMailCampaignTags()
{
    return [
        'latest_order_total' => [
            'value' => function ($tagData) {
                if (!$tagData->ordersQuery) {
                    return null;
                }
                return $tagData->ordersQuery->lastByOrderingDate()->presenter()->renderMoneyTotal();
            },
            'preview' => '[ Total ]',
            'description' => 'The total from the last order',
        ],
        'latest_products_ordered' => [
            'value' => function ($tagData) {
                if (!$tagData->orders) {
                    return null;
                }
                return count($tagData->orders) > 0
                    ? $tagData->ordersQuery->lastByOrderingDate()->presenter()->renderForCampaign()
                    : $tagData->orders->presenter()->renderEmptyOrderListForCampaign();
            },
            'preview' => '[ Products ]',
            'description' => 'List of products form the last order',
        ],
    ];
}
Compatibility with Multisite
If every site should have its own campaign messages, open the config/multisite.php file and enable the setting below. Change the value to true to enable unique configuration for each site definition.
'features' => [
    // ...
    'responsiv_campaign_message' => false,
]
Cron Without Command Line
Some hosting providers will not allow direct access to the cron table, instead they will allow you to call a HTTP endpoint every few minutes. To solve the problem, you can create a custom plugin and call the command using the Artisan Facade. Create a routes.php file in the root folder of the plugin with the route:
use Route;
use Artisan;

Route::get('/campaign_run', function () {
    return Artisan::call('campaign:run');
});
-

Voilaah
Found the plugin useful on 29 Apr, 2025
this plugin is a beast ! all my clients love to use it directly form their backend instead of having to go somewhere else on another website with subscription fees.
-

Sebastiaan Kloos
Found the plugin useful on 15 Apr, 2021
It's one of the most awesome plugins with a ton of features of the martketplace! Even for sites having a small group of subscribers, it's worth it. Can't recommend this plugin enough.
-

Jeff Goldblum
Found the plugin useful on 17 Jun, 2020
Super powerful plugin that is well worth the price. It's even possible with a bit of custom work to automate mail campaigns based off of content added to your site!
-

Matthew T Stanford
Found the plugin useful on 8 Jul, 2019
I am excited to use this plugin. But it is the second thing that I have purchased from October and have not had a great purchase experience. Both times I have been unable to use a plugin because of a glitch. I would love to still use October though. So please help me solve this issue. I am assuming because the last change log being October 2018 there may be a glitch. But I am unable to create campaigns. It just keeps loading and loading and not working. Please help. Thanks
-

zack
Found the plugin useful on 19 Aug, 2015
100$ is nothing for this plugin. It works perfect. Schedules your email campaigns sends them to your subscribers and shows you how many of them opened it or how many people unsubscribe you. It is so detailed project and it definitely worths.
-


| 3.1.4 |
Fixes cms.timezone context when previewing a template Apr 03, 2026 |
|---|---|
| 3.1.3 |
Normalize emails when saving to the subscriber model Mar 21, 2026 |
| 3.1.2 |
Fixes multisite replication for campaigns Jan 30, 2026 |
| 3.1.1 |
Add an "Unsubscribe manually" button for confirmed subscribers Jan 10, 2026 |
| 3.1.0 |
Improves List-Unsubscribe header for one-click compliance Dec 10, 2025 |
| 3.0.6 |
Fixes bug normalizing email addresses on sign up Mar 10, 2025 |
| 3.0.5 |
Fixes missing processed_at column in messages table Nov 07, 2024 |
| 3.0.4 |
Fixes link generation in multisite, relative links and custom app URL Oct 14, 2024 |
| 3.0.3 |
Fixes template refresh when a campaign is duplicated via multisite Sep 01, 2024 |
| 3.0.2 |
Language fixes May 31, 2024 |
| 3.0.1 |
Fixes multisite subscription links May 30, 2024 |
| 3.0.0 |
Adds multisite support May 29, 2024 |
| 2.0.5 |
Compatibility updates with October CMS v3.6 Feb 24, 2024 |
| 2.0.4 |
Fixes stuck version Apr 22, 2023 |
| 2.0.3 |
Adds List Unsubscribe header to emails Mar 13, 2023 |
| 2.0.2 |
Improve support with October v3 May 13, 2022 |
| 2.0.1 |
Adds dynamic template support Mar 06, 2022 |
| 2.0.0 |
Dropped support for October CMS v1 Mar 06, 2022 |
| 1.3.1 |
Adds custom tag support Dec 03, 2021 |
| 1.3.0 |
Adds translation keys Jun 24, 2021 |
| 1.2.7 |
Fixed issue with messages that have no custom syntax data Apr 03, 2020 |
| 1.2.6 |
Fixed support for accessing the template field data in Twig Mar 25, 2020 |
| 1.2.5 |
Adds new hook for rendering the subscriber template. Mar 23, 2020 |
| 1.2.4 |
Fixes issue duplicating campaigns with older October CMS builds Jan 19, 2020 |
| 1.2.3 |
Increased message content limit from 64KB to 16MB Jan 19, 2020 |
| 1.2.2 |
Fixed issue where invalid subscriber email addresses would prevent campaigns from finishing sending Jan 19, 2020 |
| 1.2.1 |
Added unsubscribe and verification events. Oct 29, 2018 |
| 1.2.0 |
Add support for capturing meta data with the subscriber. Oct 29, 2018 |
| 1.1.26 |
Fix to the mail sending internals. Sep 22, 2017 |
| 1.1.25 |
Minor update to the mail sending internals. Aug 15, 2017 |
| 1.1.24 |
Update to address framework upgrade. Aug 10, 2017 |
| 1.1.23 |
Minor update to subscribe command internals. Jul 14, 2017 |
| 1.1.22 |
Fixes exception when opening a deleted campaign in the browser. Jan 25, 2017 |
| 1.1.21 |
Add a processing step to the campaign workflow. This fixes a bug where campaigns are marked as sent prematurely. Nov 22, 2016 |
| 1.1.20 |
Recipient groups can now be added directly to lists. Nov 22, 2016 |
| 1.1.19 |
Add event hook called when a user unsubscribes (responsiv.campaign.beforeUnsubscribe). Oct 28, 2016 |
| 1.1.18 |
Fixes bug when creating a subscriber directly from a list. Sep 21, 2016 |
| 1.1.17 |
Fixes minor bug preventing users from unsubscribing. Sep 07, 2016 |
| 1.1.16 |
Subscribers can now be confirmed manually. Added filters to subscribers page. Aug 19, 2016 |
| 1.1.15 |
The Template component can now specify a custom page for verify and unsubscribe actions. Aug 16, 2016 |
| 1.1.14 |
Update main menu item to include SVG version. Aug 14, 2016 |
| 1.1.13 |
Fixes issue where duplicate emails being sent for instant campaigns with large subscribers. Jul 20, 2016 |
| 1.1.12 |
Fixes bug when sorting list by number of subscribers. Jul 20, 2016 |
| 1.1.11 |
Compatibility with October stable. Apr 01, 2016 |
| 1.1.10 |
Fixes subscriber search on list preview screen. Feb 22, 2016 |
| 1.1.9 |
Add a checkbox to automatically confirm new subscribers in the back-end. Dec 07, 2015 |
| 1.1.8 |
Subscribers are no longer automatically deleted after 14 days. Aug 20, 2015 |
| 1.1.7 |
Added back-end permissions for managing campaigns and subscribers. Aug 19, 2015 |
| 1.1.6 |
User interface improvements. Aug 12, 2015 |
| 1.1.5 |
Improve caching of message content. Aug 10, 2015 |
| 1.1.4 |
Subscriptions are now throttled allowing 3 requests every 15 minutes. Aug 05, 2015 |
| 1.1.3 |
Prevent instances of data loss when the source template no longer exists or has changed. Jul 27, 2015 |
| 1.1.2 |
Fixes a bug where launching against group subscribers will send to everyone. Jul 27, 2015 |
| 1.1.1 |
Each campaign message will strictly send once per hour even if the worker is called multiple times. Jul 24, 2015 |
| 1.1.0 |
Added subscriber import options. Subscriber IP addresses are now logged. Jul 24, 2015 |
| 1.0.8 |
Staggered launch can now be performed for a fixed amount of messages sent every hour. Jul 14, 2015 |
| 1.0.7 |
Improve the efficiency of the subscriber list page. Jul 03, 2015 |
| 1.0.6 |
Fixes bug preventing a list from being deleted. May 09, 2015 |
| 1.0.5 |
Minor fix for latest build. Apr 28, 2015 |
| 1.0.4 |
Implement the verification process for new subscribers. Apr 06, 2015 |
| 1.0.3 |
Seed all database tables Mar 20, 2015 |
| 1.0.2 |
Set up database tables Mar 20, 2015 |
| 1.0.1 |
First version of Campaign Mar 20, 2015 |