
Google Analytics 4 integration plugin
This plugin adds Google Analytics 4 tracking and reporting features to October CMS. This plugin requires October CMS 3.3 or above.
Note: This plugin does not support Universal Analytics.
If you are using October CMS v1 or v2, install v1.3 of the plugin with the following command:
composer require rainlab/googleanalytics-plugin "^1.3"
Important: this plugin requires the
bcmathPHP extension. It is required by the Google PHP API.
Configuring the Google Analytics and Google Cloud accounts
To use the plugin, you will need to have a Google Cloud project with a service account, as well as the Google Analytics Data API enabled for that project. To begin, sign into the Google Cloud Console and create or select your project.
To create a service account in a Google Cloud project:
- Open the Credentials page and select your project.
- Click the Create credentials button and select Service account.
- Enter a name for the service account, e.g. "October CMS GA". Enter an ID for the service account, e.g. "october-cms-ga".
- Click Done. This will create the service account and redirect back to the account list.
To generate and download a private key file for the service account:
- Click the account you just created in the Service Accounts list.
- Click Keys in the top menu.
- Click Add Key / Create new key and select JSON. This will download the JSON file. You will need this file later to configure the plugin.
The plugin requires Google Analytics Data API to be enabled for the Google Cloud project. This is needed to fetch the analytics data and display it on the October CMS dashboard. To enable the API:
- Return to the project dashboard page in the Google Cloud Console.
- Click Enabled APIs & services in the sidebar.
- Click Enable APIs and services in the top menu.
- Search for "Google Analytics Data API".
- Click the found API and enable it.
You can alternatively use this link, but make sure you're enabling the API for the correct project.
Next, you need to give the service account access to your Google Analytics account:
- In the Google Cloud dashboard select your project, click APIs & Services and then Credentials in the sidebar.
- In the Service Accounts list, copy email of the service account you created.
- Go to Google Analytics and select a GA4 property you want to work with.
- In the left-hand menu, click Admin.
- In the Property column, click on Property Access Management.
- Click the Add + button and enter the email address of the service account.
- Select the Viewer permission for the service account.
- Click the Add button to save the changes.
Configuring the plugin
- Open your October CMS installation Administration Area and go to Settings / Google Analytics.
- Upload the JSON file you downloaded before to the Private key field.
- To find the Analytics Property ID - go to your Google Analytics property's Admin page and click Property Settings. Copy the Property ID value from the page and paste it into the corresponding field on the plugin settings page.
- To find the Measurement ID value you first need to create a Data Stream on the Admin page of your Google Analytics 4 property. After creating a stream, click it in the stream list and copy the Measurement ID value. Paste it into the corresponding field on the plugin settings page.
- Save the settings.

Installation via Command Line
php artisan plugin:install RainLab.GoogleAnalytics
Installing the Google Analytics tracking code
You can use Google Tag Manager to install the tracker code. Below is an explanation how to install the tracker code manually.
- Drop the Google Analytics Tracker component to your CMS layout.
- Add the following code to the layout immediately after the <head> element:
{% component 'googleTracker' %}
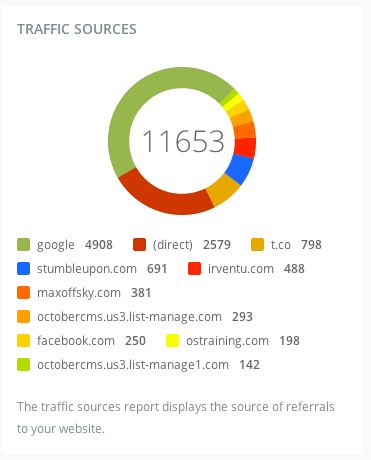
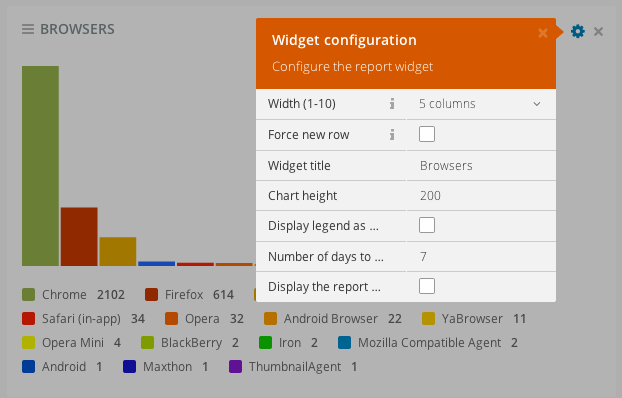
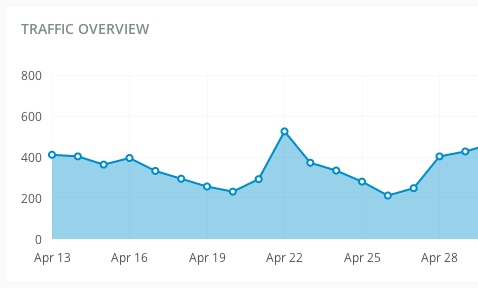
After installing the tracker, you can add Google Analytics dashboard widgets and preview the traffic statistics without leaving October CMS.
Troubleshooting
Fix for Windows / XAMPP
cURL error 60: SSL certificate problem: unable to get local issuer certificate
- Follow this link: http://curl.haxx.se/ca/cacert.pem and save it in a file called
cacert.pem. - Open your
php.inifile insert or edit the following line:curl.cainfo = "[pathtothisfile]\cacert.pem"
- Restart Apache
Popup message simply saying "error" when trying to add the JSON key file.
Some ad-blockers, such as Chrome's uBlock Origin extension or Firefox's own built-in algorithms, may prevent the uploading of the JSON file key. Disabling these, or whitelisting the October CMS website, may resolve this issue for you.
-

Tom Steventon
Found the plugin not useful on 26 Aug, 2020
Does not appear to work currently. Pops up a message simply saying "error" when trying to add the json key file.
-

Paul van de R
Found the plugin useful on 20 Apr, 2020
Plugin is easy to use and quick to get up and running in the templates/pages. Like that there are a few options to set, really straight forward. Best ofcource is the ability to show basic google stats at the frontpage of the backend. Clear and easy to understand graphs of basic information. I think it will become a default plugin for me.
-

Fayaz Valli
Found the plugin useful on 1 Jul, 2019
After installing and configuring the plugin. When adding the widgets to the dashboard. I get the following error messages on the widgets.
{"error":{"errors":[{"domain":"global","reason":"insufficientPermissions","message":"User does not have any Google Analytics account."}],"code":403,"message":"User does not have any Google Analytics account."}}How do I resolve this?
-

Lucas Zamora
Found the plugin useful on 2 May, 2019
nice!
-

Richard Clark
Found the plugin useful on 10 Jan, 2019
The Plugin Crash the Dashboard had to even after uninstalling still crash the admin dashboard Note: Only after adding to dashboard
-

king
Found the plugin useful on 6 Apr, 2017
i have buy this plugin why can not update
-

Jarek
Found the plugin useful on 10 Mar, 2017
It works without problems.
-

Harry
Found the plugin useful on 15 Feb, 2017
Very nice plugin. Setup instructions clear, but maybe for an older google console UI, had to faff around a bit to find the sections needed. But does the job
-

Paddy Sherry
Found the plugin useful on 17 Dec, 2016
It just works! The documentation actually lists all the steps. Fantastic
Turning on API access is a bit tricky for a first timer but that's all on Googles end.
One thing to remember with this plugin is that there is no actual analytics page with charts. It's even better than that as you just add the widgets to your Oct Dashboard. Simple step but it had me puzzled for a while.
-

Sam
Found the plugin useful on 14 Dec, 2016
Wonderful, followed the instructions and got it set up without any issues.
Thanks.
-

Devin Green
Found the plugin useful on 12 Nov, 2016
Very awesome. tough to setup but from a developer standpoint it's pretty easy
-

Paul Schunck
Found the plugin useful on 4 Aug, 2016
Great plugin and easy to set up.
-

Denis Ricard
Found the plugin useful on 5 Jul, 2016
Simple and clever implementation and use. I haven't had the chance to extend it yet.
-

Edwin
Found the plugin useful on 24 Jun, 2016
Very helpful. Easy to use. If you are crashing on error while uploading .json key try to disable adblock.
-

sam
Found the plugin useful on 31 May, 2016
Good Plugin and all the instructions are correct as of May 2016 with the new Google API console. Many thanks.
-

Enok Madrid
Found the plugin useful on 2 Apr, 2016
If you follow the instructions just right, It Works Great! ...instructions could give better explanations to navigate google analytics settings.
-

Hessel
Found the plugin useful on 26 Jan, 2016
Thanks for the update! Works fine now. Also better documentation! Great work. Thanks
-

Denis Rendler
Found the plugin useful on 22 Oct, 2015
Thanks, @Gavin Foster! Until I read your notes I was only getting 403. Useful plugin
-

ioCare
Found the plugin useful on 16 Oct, 2015
Instruction says: Click the Admin main menu tab at the top. Select the Property > User Management menu item. Paste the email address from the clipboard in to the field Add permissions for and make sure the permission is set to Read & Analyse. Click Add.
But this not found anywhere in Google Analytics console.. Please help!
-

Gavin Foster
Found the plugin useful on 15 Oct, 2015
So glad I finally got this working! Great work! The only "gotch-ya" was the instructions say that the "Analytics View/Profile ID number" is found in GA under "Account / Account Settings"... I got errors when using that id number so used the one found under "View / View Settings" (different ID number) and it worked perfectly... Happy days!
-

Alex Bass
Found the plugin useful on 7 Jun, 2015
Must have, works great. Would love to have a dashboard of Analytics automatically set up for new user accounts though.
-

Matiss Janis Aboltins
Found the plugin useful on 1 Jun, 2015
An amazing plugin. I am using this for all of my projects because of the dashboard widgets. Thanks!
-

Scott Bedard
Found the plugin useful on 7 May, 2015
Excellent plugin, this is a nice compliment to the backend dashboard!
-

Mike Sosin
Found the plugin useful on 25 Apr, 2015
Thank you for your plugin, it took me a long time before setting it up.
-

Juan Carlos Lora
Found the plugin useful on 20 Feb, 2015
Thanks. It works.
-

Vojta Svoboda
Found the plugin useful on 17 Jan, 2015
Omg! Thanks a lot, i really use Account ID!
-

Stefan
Found the plugin useful on 1 Oct, 2014
The explanation reeeally should be improved upon. Maybe sceenshots?
-

Anton Kost
Found the plugin useful on 24 Jul, 2014
got it! You dont have to upload the json to your OctoberCMS.
After creating a new client id in googles dev console you habe to generate a new P12 key and upload this one to your October instance.
-

Dmitriy Pavlov
Found the plugin useful on 11 Jun, 2014
Great plugin!
-

Mustafa Akbaş
Found the plugin useful on 5 Jun, 2014
it works perfectly. thanks.
-

Sercan Virlan
Found the plugin useful on 26 May, 2014
I think the plugin needs cache and cronned job, sometimes the dashboard take long time to load.
-

Martin Tale
Found the plugin useful on 25 May, 2014
Works like a charm but instructions should be more detailed.
-
Sercan Virlan
Found the plugin useful on 23 May, 2014
works like a charm !
-

XSmalbil
Found the plugin useful on 21 May, 2014
Works great, make sure you check file permissions!
-

bestxp
Found the plugin useful on 20 May, 2014
all work
-


| 2.1.0 |
Bump package versions to update composer dependency tree Feb 20, 2026 |
|---|---|
| 2.0.3 |
Adds opt-in multisite support to settings Mar 12, 2024 |
| 2.0.2 |
Minor bugfix in widget base class May 05, 2023 |
| 2.0.1 |
Updated to support Google Analytics 4 May 02, 2023 |
| 1.3.1 |
!!! Package renamed to rainlab/googleanalytics-plugin Mar 26, 2021 |
| 1.3.0 |
!!! Upgraded tracker code to Universal Analytics (gtag.js) Oct 08, 2020 |
| 1.2.5 |
Fixed issues with PHP 7.4 compatibility. Apr 08, 2020 |
| 1.2.4 |
Added permission for dashboard widgets. Added Turkish, Spanish and Estonian translations. May 16, 2019 |
| 1.2.3 |
Added a switch for forceSSL Apr 10, 2018 |
| 1.2.2 |
Improve translations, bump version requirement to PHP 7 Aug 18, 2017 |
| 1.2.1 |
Update the plugin compatibility with RC8 Google API client Jun 07, 2016 |
| 1.2.0 |
Update Guzzle library to version 6.0 Apr 19, 2016 |
| 1.1.0 |
!!! Updated to the latest Google API library Jan 26, 2016 |
| 1.0.7 |
Removes Client ID from settings because the workflow no longer needs it Jan 14, 2016 |
| 1.0.6 |
Fixes dashboard widget using latest Google Analytics library Jan 11, 2016 |
| 1.0.5 |
Minor fix to support the updated Google Analytics library Jul 14, 2015 |
| 1.0.4 |
Fixes a bug where the certificate upload fails Jun 19, 2015 |
| 1.0.3 |
Minor improvements to the code Feb 13, 2015 |
| 1.0.2 |
Fixed a minor bug in the Top Pages widget Jun 25, 2014 |
| 1.0.1 |
Initialize plugin May 12, 2014 |
Upgrading To 1.1
The settings and instructions for authorizing Google have been drastically simplified. For existing accounts, you will need to generate a new key file using these steps.
- Log in to the Google Developers Console and search for Service Accounts
- If you need to create a new Service Account, click on the Create Service Account at the top and then add a name and click on Create.
- You should see an account in the Service Accounts list and click the menu in the Actions column and select Create key.
- Choose the Key type of
JSON. - Download the file to your computer and upload it to the October back-end settings form.
The Profile ID number has also changed, follow these settings to find the new one.
- In a new tab, navigate to the main Google Analytics site and select the property you want to track.
- Click the Admin main menu tab again and select View > View Settings from the menu. Copy to your clipboard the Profile ID (should be a number).
- Paste this number in the Analytics View/Profile ID number field in the October back-end settings form.
Upgrading To 2.0
Google will stop processing data for Universal Google Analytics on July 1, 2023. You will need to create a Google Analytics 4 property, upgrade the plugin, and configure it to access the new property. Refer to the plugin documentation for a detailed description of the configuration process.